Use this screen to work on a single disputed transaction in detail.
To resolve a dispute, click the Resolve button at the top right corner of this screen. We explain the various types of dispute resolution and what to do in Resolve the dispute.
Warning: Disputes that you have placed in your My Claimed Transactions queue won't appear in the live queue any more, even though the disputes may be live.
To find and select a disputed transaction, use the disputed transaction queues. See the Queues topic for information on the queues.
To examine a disputed transaction in detail, find it in your queue and then display the details:
Click the ID number of the transaction in the ID column. The Dispute Details screen appears.
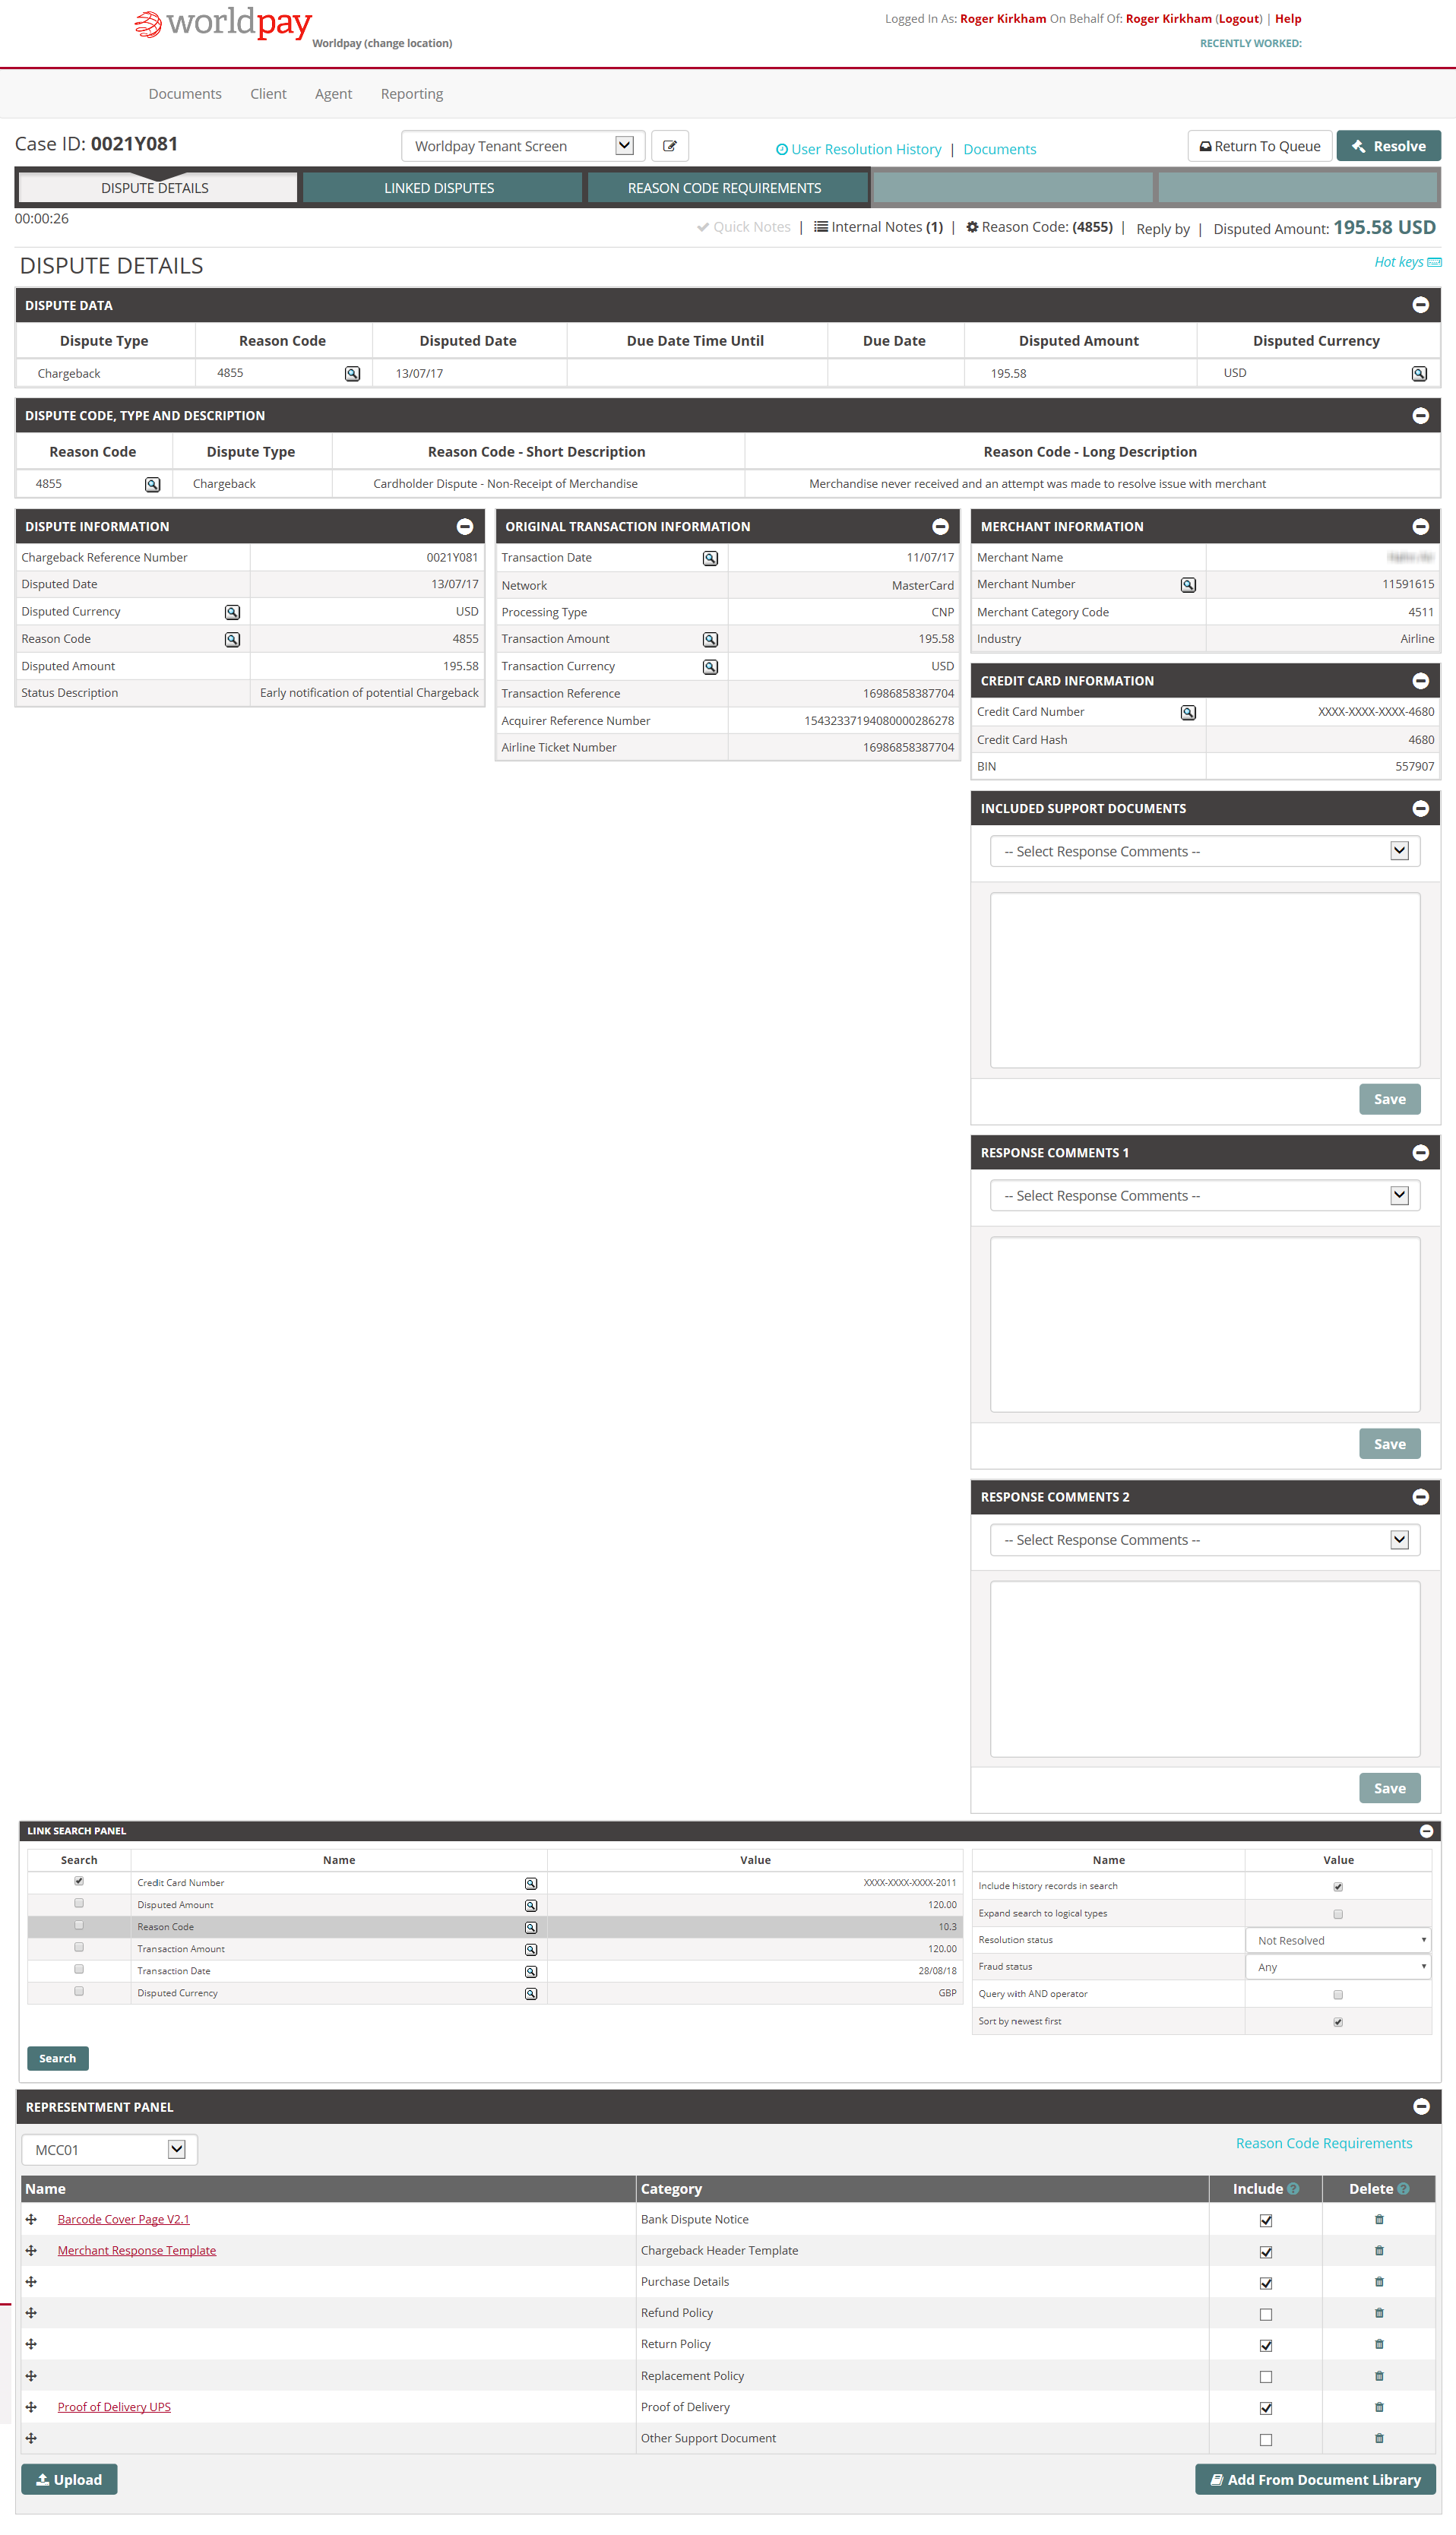
Note: This is quite a large screen that contains a lot of information. You may find it easier to deal with the screen if you minimise certain areas. To do this, click the - (minus) symbol on the right of the black header bars.
This screen contains several different areas.
This area shows you the type of dispute (chargeback in the example above) and the reason code. There are also a series of dates:
Disputed date - This is the date the transaction in dispute took place. For example, a shopper bought some goods and paid for these on the 14th of October 2017: this is the date that appears as the Disputed date. This date applies even though the shopper may have made the complaint several weeks after the 14th of October 2017.
Due Date Time Until - This shows you how much time you have to work on this transaction. The default value is 12 days from the date the transaction was loaded onto the system.
Due Date - This is the date that this transaction must be resolved.
The disputed amount and currency of that amount also appear in this area.
This area shows you the code for the reason the transaction is disputed, the type of dispute, a short description of the reason code and a longer description.
This area shows the reference number of the dispute (chargeback reference number in this case), the disputed date, currency, reason code, amount and status.
This status only appears in the Live queue. This is a transaction which is subject to a chargeback. You must take action, otherwise the chargeback is applied and debit is applied to your account. Normally you have 12 days to defend the chargeback.
In the Live queue, this status indicates a fraud related chargeback. You must take action, otherwise the chargeback is applied and debit is applied to your account. Normally you have 12 days to defend the chargeback.
In a Notification queue, this status indicates that you have lost this chargeback and a debit has been or will be applied to your account. Worldpay will debit your account. You cannot work on this transaction, only view it.
This status only appears in a Notification queue. This is a disputed transaction that Worldpay has tried to defend on your behalf. Worldpay has already sent defence information to the schemes (Mastercard, Visa).
This status only appears in a Notification queue. This is a transaction with an early warning of a potential chargeback. You can't work on this transaction yet, but you can investigate it and prepare defence material. Just because a transaction has this status doesn't mean the transaction automatically become a chargeback - sometimes mistakes are made, sometimes an allegation is withdrawn.
This status only appears in the Live queue. This is a request for information for a transaction, which hasn't yet turned into a chargeback. You must take action, otherwise this transaction may become a chargeback and a debit applied to your account. Normally you have 12 days to reply to this request.
This area shows the information for the transaction before it was disputed. Most of the information is self explanatory. Some needs a description:
Transaction Date - This is the original transaction date
Network - This will be Mastercard or Visa
Processing type - This is how the transaction was processed. In the example screen above, CNP stands for Card Not Present. MOTO is Mail Order or Telephone Order.
Transaction Reference - This is a Worldpay reference number. For our Airline customers, this is the passenger's ticket number.
This area shows the merchant name and the merchant's industry. Two of the fields need some description:
Merchant Number - This is the Worldpay Merchant ID (MID) for your company. You may have several MIDs; this will be the MID the transaction was processed under.
Merchant Category Code - Merchant Category Code (MCC) - This is a four-digit number listed in the International Standards Organisation (ISO) 18245 document for retail financial services.
This area shows the payment card information, including the credit card number and also:
Credit Card Hash - This is the last four digits of the credit card. It's a small number that represents the full credit card number in the system
BIN - This is the Bank Information Number (BIN) which identifies the bank that issued the credit card to the credit card user. The BIN number is the first four to six digits of a credit card number
Use this area to show whether you've added any supporting documents to the transaction. Supporting documents are useful information that will help to defend the chargeback or other disputes. Some examples of support documents are:
Details of the item(s) or service(s) that you provided with this transaction. For example:
The above is not a complete list. You can include any reasonable information that you believe shows that the chargeback or disputed claim is not justified.
If you include a support document or documents, select Support Documents included from the drop down list.
Use this area as a free-text area to include your own comments and information related to this dispute.
For example, you may have investigated this dispute and found that a refund isn't justified. You would select Credit not due from the drop-down list.
Select the response from the drop-down list.
Click the Save button to save your selection.
Use this area to record any additional comments or responses you made to previous requests linked to this disputed transaction.
For example, if after you make some enquiries, you believe that in addition your cancellation policy shows that a refund is not justified, select Cancellation Policy from the drop-down list.
Select the response from the drop-down list.
Click the Save button to save your selection.
With the Link Search functionality in this panel, you can defend multiple disputes at once and add the same defence material and information to all selected disputes.
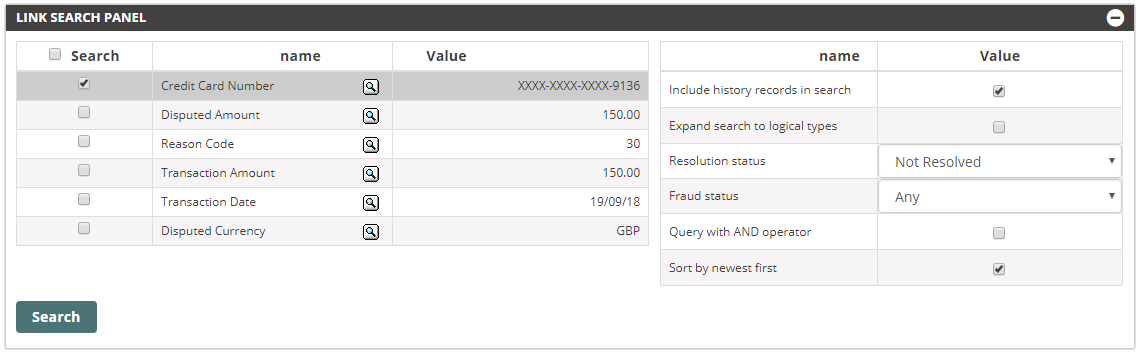
To search for linked disputes while working on a case:
Untick 'Include history records in search' on the right-hand side of the panel. This stops the risk of defending past disputes that have already been responded to.
Select the criteria you wish to apply to search for linked disputes in the 'Search' column on the left-hand side. We recommend searching by Credit Card Number, however you can use any of the criteria available.
Note: You can preview linked disputes by clicking the magnifying glass next to the selected category name.
Click 'Search' to view results, displayed below the Link Search Panel as a table.

Note: You can perform a search for linked disputes without the dispute being allocated to your personal queue. But you will need to be allocated the dispute to take further action within Link Search, such as adding defence material.
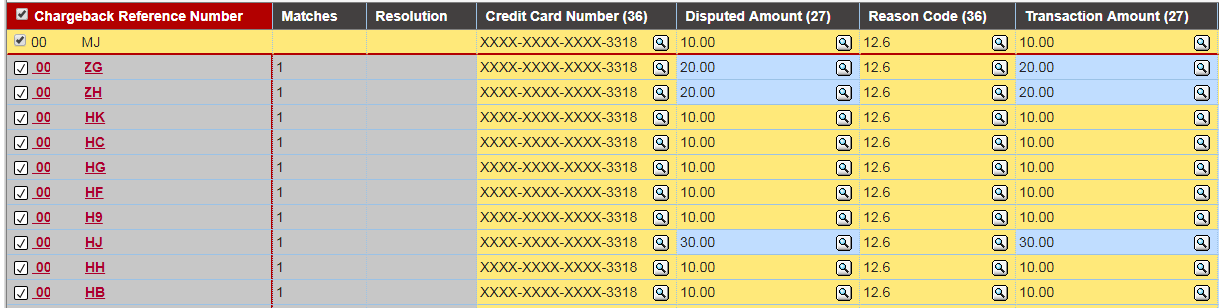
When working on linked disputes after using the Link Search Panel, you'll need to analyze the results from the table displayed below the panel.

Here are a few useful things to know about this table:
A - The first row always shows the current dispute from which you ran the search for related disputes.
B - The column headed 'Matches' shows the number of matches found for each data element.
C - A cell highlighted yellow shows a primary match, where the data element matches exactly the current dispute. A cell highlighted blue shows a secondary match, where the data element matches with other disputes included in the results, but doesn't match with the current dispute.
When defending several disputes at once, you should always select the first row to include the current dispute that you're working on. This is because the comments and defence material that you wish to copy to linked disputes must be added in the dispute you ran the Link Search from.
If you wish to defend a linked dispute separately from the current dispute, you should open this other dispute in a new tab and defend it from there. To do this, simply click on the dispute reference from the Link Search panel: this will open a new tab from which you can claim the dispute to add it to your queue, and defend it separately (or with any other linked disputes applicable to this dispute).
To resolve linked disputes:
Select the disputes that you wish to work on from the table of results. You can select all dispute results by checking the box at the top left-hand corner of the table.
Note: In the linked disputes table, you should only select disputes with a status description of 'Charged back' or 'Chargeback - Action Required' (Status Description is the last column of the table). Any other statuses, such as 'Early Notification of potential chargeback' should not be worked on. See Dispute Information for more details on dispute statuses.
Click 'Claim selected'. At this stage, you may see an alert on the screen if any the disputes selected have been already claimed by other users. Depending on your role in the Dispute Resolution Centre, you may be able to override this lock (see Roles for more details). If you don't claim the selected disputes at this stage, they will be automatically claimed by you later on when you take any action (adding documents, for example).
Click either 'Upload Documents' or 'Add From Document Library' to add documents to the grouped disputes.
Note: You should add documents to grouped disputes inside the Link Search Panel, and not within the current dispute's 'Representment Panel'. If you do this, it will only add the selected documents to the current dispute.
Update and save all required information in the other panels of the current dispute. This can include:
Included Support Documents
Response Comments
Choose Fraud Type
Actual Dispute Reason Code
Any other fields and panels such as Transaction ID or IATA number, if applicable
Back to the Link Search Panel, click 'Copy Fields' to copy the information updated and saved in the previous step to all linked disputes that you've selected.
In the lightbox that appears, check the box next to each column to confirm you wish to copy that information to the grouped disputes, then click 'Save'.
To resolve all disputes included in this group, click 'Resolve Selected'. A 'Resolve Link Transactions' panel now displays the disputes you've defended together.
Note: Clicking 'Resolve Selected' resolves and applies the same resolution to all selected disputes. The 'Resolve' button at the top right-hand corner of the screen only resolves the current dispute. If you don't wish to proceed with resolving all selected disputes at once, click 'Close' but note that the documents and copied fields are already saved across all selected disputes. To remove documents added to linked disputes, go to each dispute to deselect the documents.
Select between 'Resolution' or 'Followup' and if necessary, add some internal notes. These will be applied across all selected disputes.
Click 'Save'. The Linked Disputes table will now show a 'Resolution' column to display the resolution you've selected. For more details, see Resolve the dispute.
Return the current dispute to the queue by clicking 'Return to Queue'. If you don't return the current dispute to the queue, it will show in the 'My Claimed Transactions' tab.
Use this area (panel) to add the various documents described in the Included Support Documents topic above.
To add a document or documents:
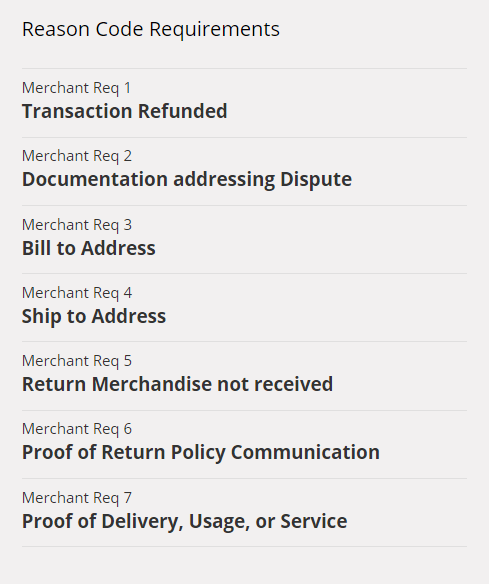
Select the reason code from the drop-down list. A list of the various reason code requirements appears if you click the Reason Code Requirements field:
Select the documents to include in the transaction; click the Include checkbox next to each document you want to include. Click the Delete checkbox next to each document you want to delete from the disputed transaction.
Click the Upload button to upload the documents you have selected.
To add a document to the Representment Panel list:
Click the Add from Document Library button. The Document Library screen appears:
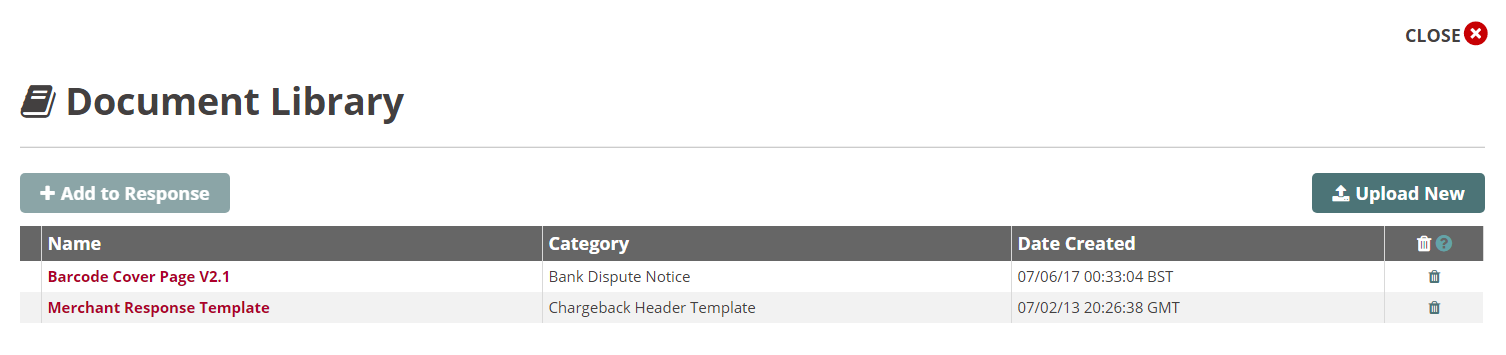
Select a document from the list and click the Add to Response button.
At the top of the Dispute Details screen is a menu bar. It has three options:
Dispute Details - The screen that is currently displayed
Linked Disputes - Display disputes that are linked to the current dispute you have on your screen. See the Linked Disputes section below.
Reason Code Requirements - A list of the reason codes used by your organisation.
This screen shows you the disputed transactions that are linked to the current transaction on your screen. To view the linked disputed transactions:
Click the Linked Disputes option on the menu bar.
The Linked Disputes screen appears. It shows disputes linked to the dispute you're working on by:
Linked Sequential Disputes - Card Number - Any disputed transactions with the same card number
Chargeback Reference Number - Disputed transactions with the same chargeback number
Linked Sequential Disputes - Specifically unmodified merchant transaction ID number
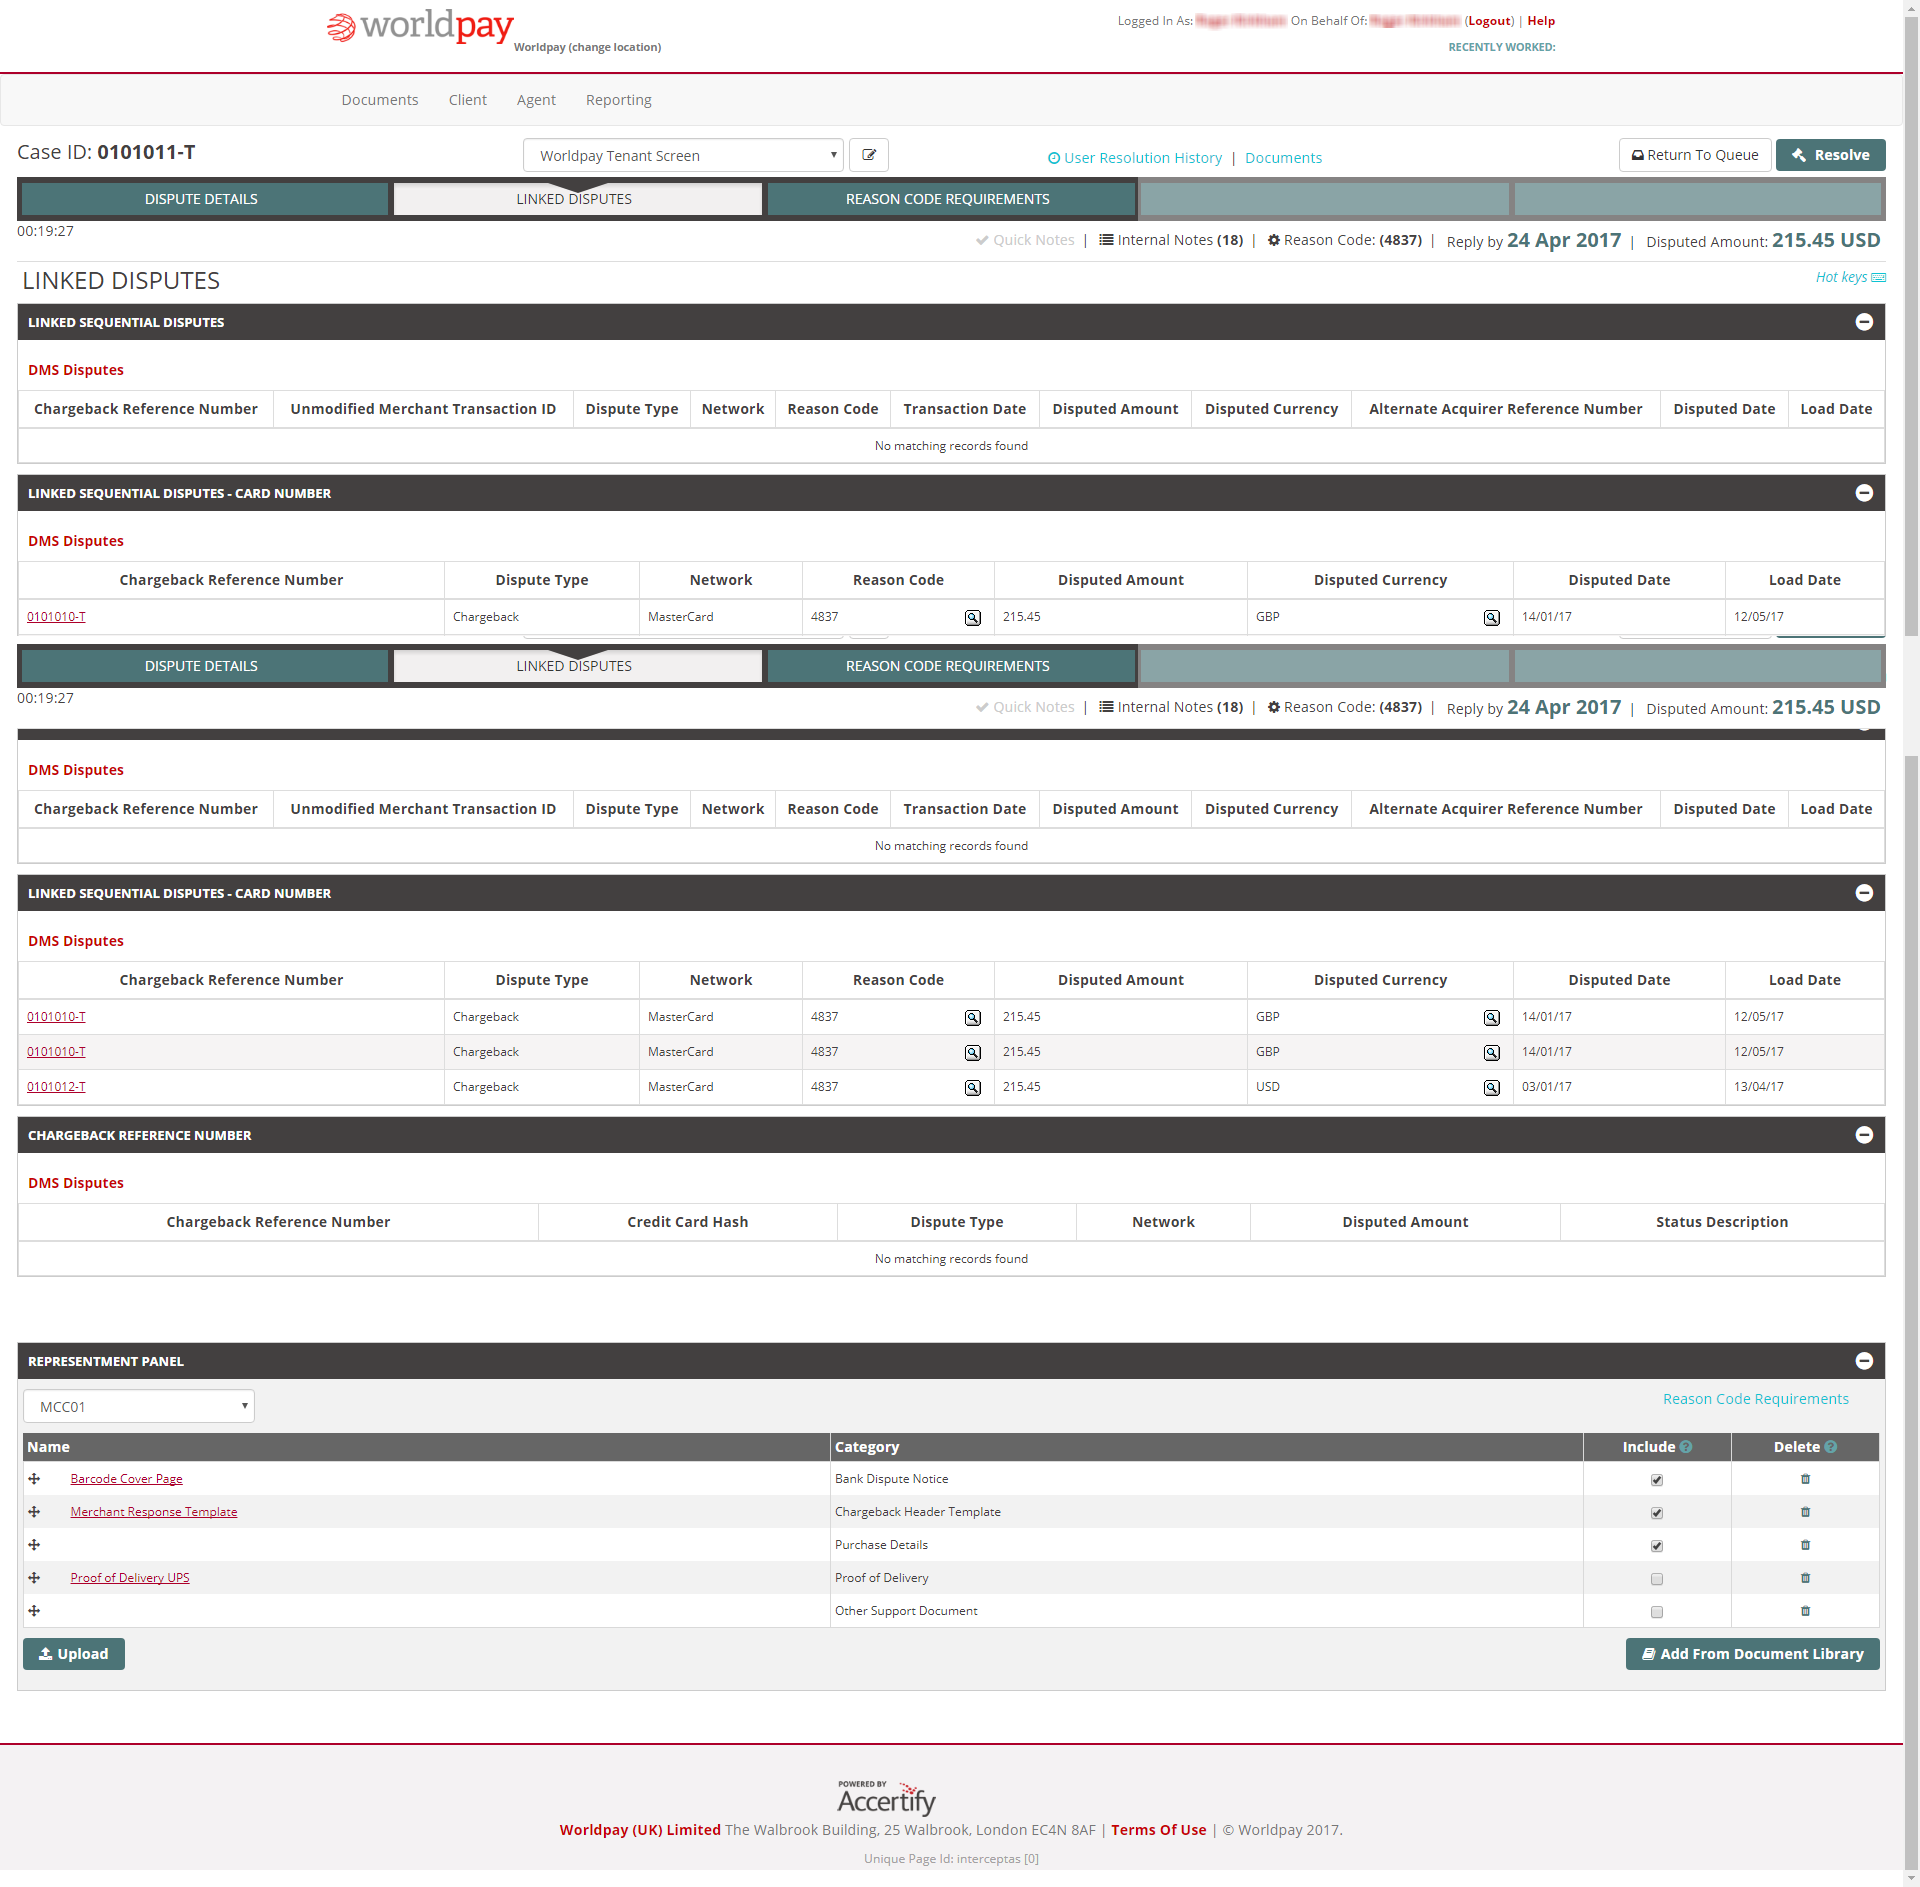
Supporting documentation appears in the Representment Panel part of the screen
To return to your original disputed transaction, click the Dispute Details option on the horizontal menu bar.
At the top of the Dispute Details screen is a menu bar. It has three options, the third option is the Reason Code Requirements screen.
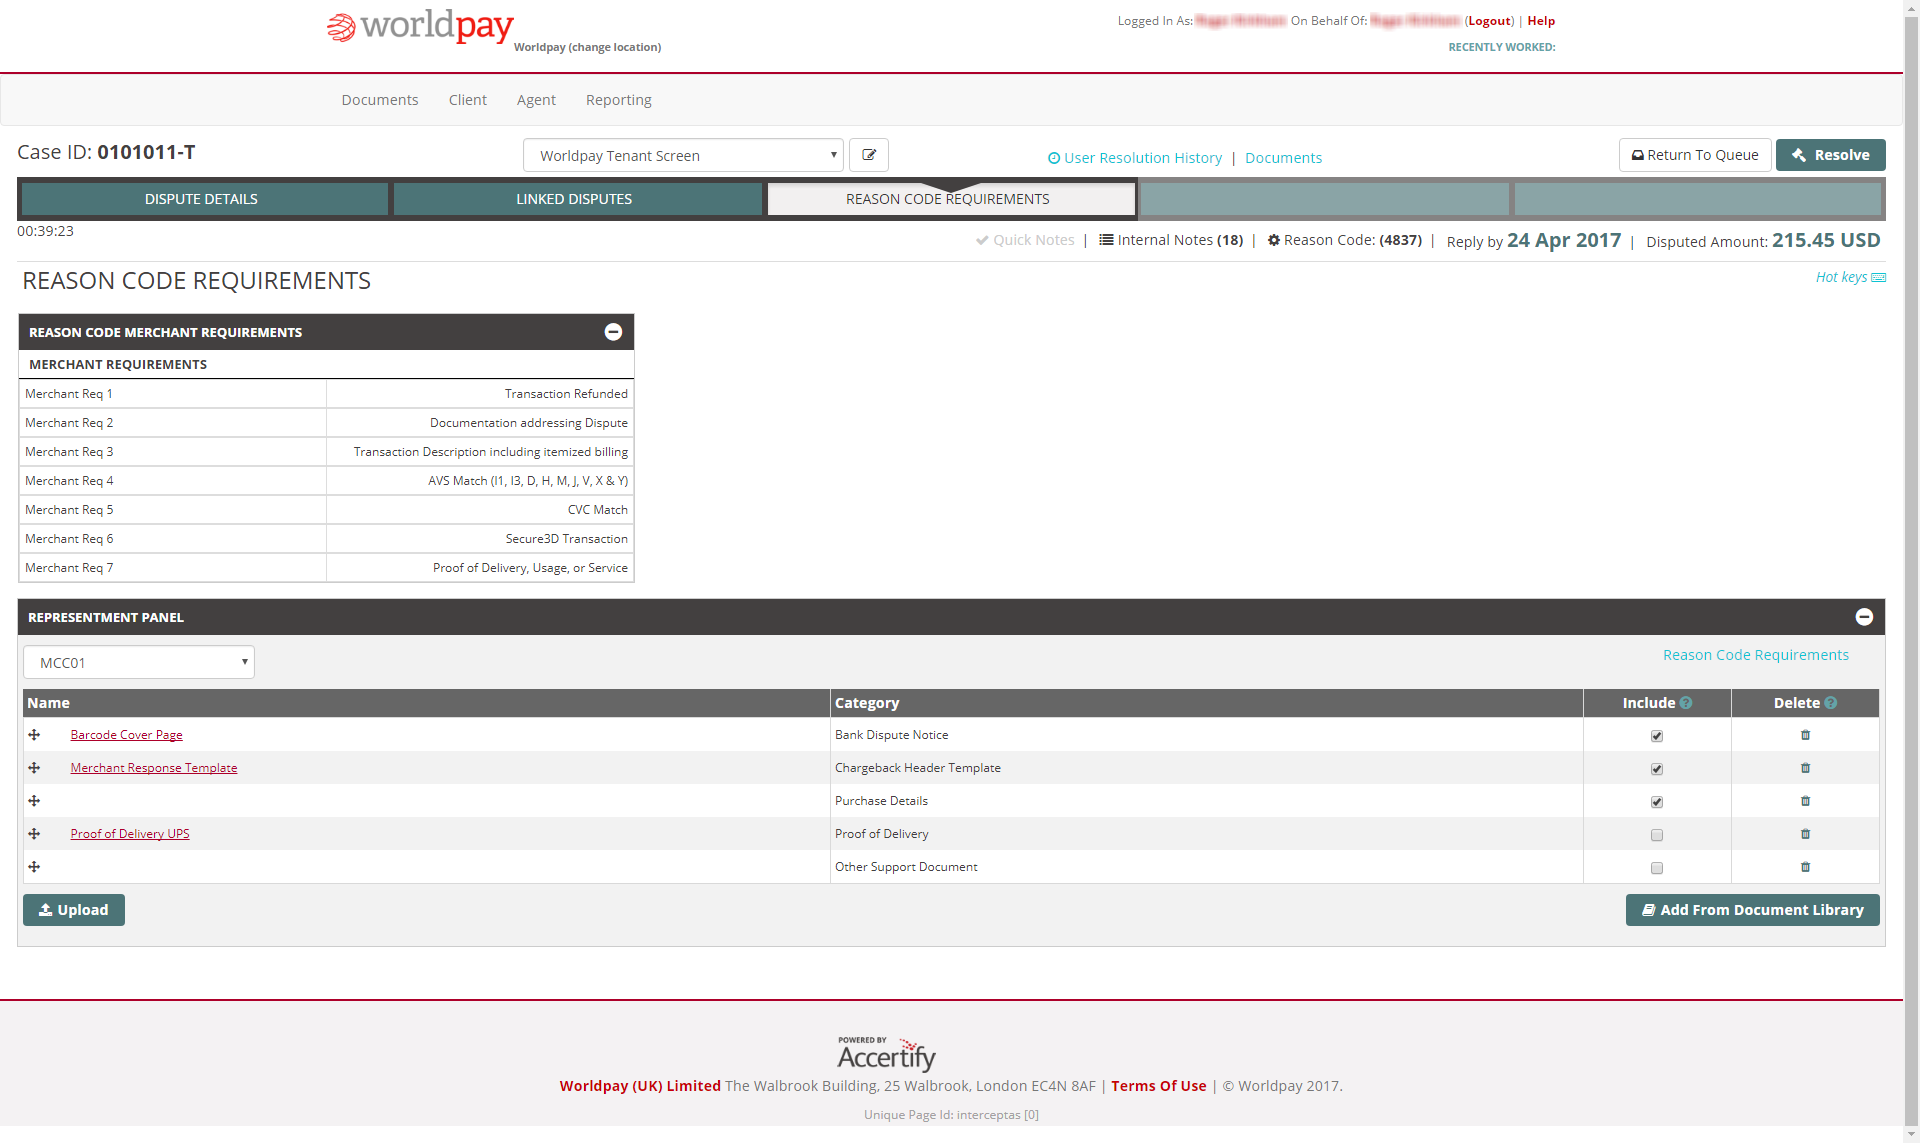
This screen contains a list of the reason codes used by your organisation. In the example above, there are seven requirements listed in the table. The list of reason codes is described in the Representment Panel section above.
To resolve a dispute, click the Resolve button at the top right corner of this screen. We explain the various types of dispute resolution and what to do in the Resolve the dispute topic.
| Guide feedback?
Email us at: guides@worldpay.com |
   
|
|
© Worldpay 2019, LLC and/or its affiliates. All rights reserved. |