The Users screen is for managing the users of your system.
You can search for a user, view a user, edit an existing user, add a user to the system and delete a user from the system.
Note: This is a screen for system administrators - most users will not be able to view or access this screen.
To display the Users screen:
From the Landing screen, select Configure > Users. The Users screen appears. The screen has the search filter at the top, with a list of all the users below the search filter fields.
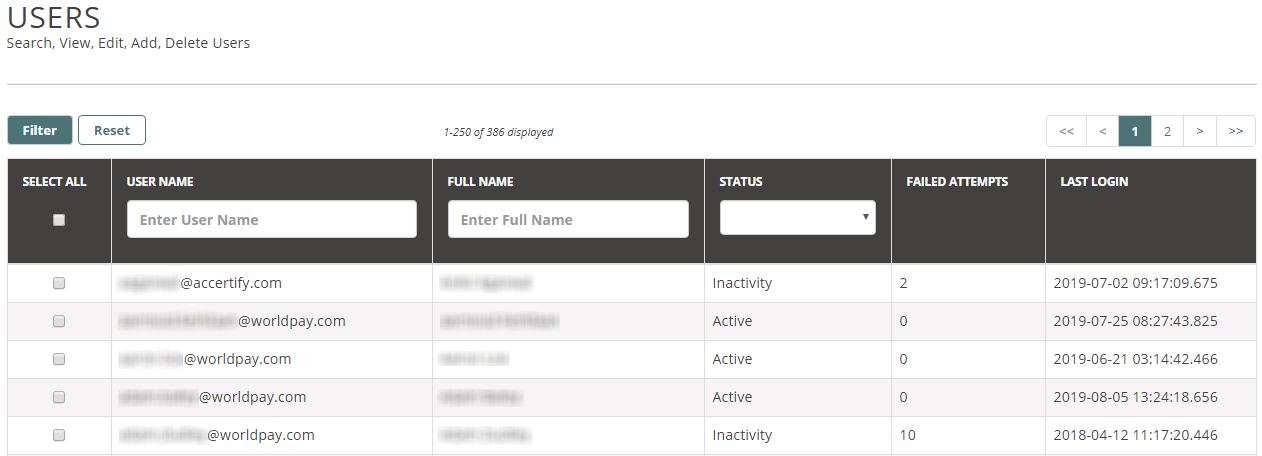
The status column shows the current status of each user in your system. There are three statuses:
Active - Currently working in the system
Inactive - Permitted to work in the system but not working now
Password Change Required - The user's password has expired and needs to be changed
Locked - User is locked out of the system and cannot access it
This column shows the number of attempts a user has made to log-in to the system.
This column shows the date and time the user last successfully logged in to the system.
From here you can:
From the Landing screen, select Configure > Users. The Users screen appears.
To select a user from the list of users, click the checkbox next to the user. To select all the users, click the Select All checkbox, and then click the Filter button.
To display a group of users with the same status, select the status from the Status drop-down list, and click the Filter button.
To search for a user by name, or part of their name, enter their name or part name in the User Name field.
Click the Reset button to reset your searches. The screen shows a list of all the users, of any status.
Best practice: If you want to add several users to the system, you may save time and effort if you copy an existing user profile. See Copy a user.
From the Landing screen, select Configure > Users. The User screen appears.
Scroll down to the bottom of the screen and click the add button to display the USERS (ADD) screen.

This screen contains several groups of fields. The first group of fields covers basic information:
Enter the email address of the user in the User Name field. We use email addresses as user names.
In the Full Name field, type the first name, middle name (if necessary) and last name of the user.
In the Email field, type the email address of the user.
Note: We use this email address to send password reset notices to the user.
In the Password field, type a temporary password for the user. The password must:
Begin with an alpha-numeric character
Contain a minimum of 8 characters
Contain at least 1 number
Contain 1 of the following special characters: @, #, or $
You cannot:
Change a password more than 8 times in 24 hours
Enter a password that contains spaces
Use the same password more than once
Note: For PCI (Payment Card Industry) compliance, users must change their passwords at least once every two months. If you want the password change to occur more often, contact Worldpay and we will change the setting.
In the Locale drop-down list, click the user's location.
Note: The locale must be either en_GB or en_US. If you are based anywhere other then the USA, select en_GB.
In the Time Zone drop-down list, click the user's time zone.
In the Phone field, type the user's phone number.
In the Status drop-down list, click the active status of the user. When you set up a new user, select the Password change required status.
Note: The system convention is to use email addresses as user names.
The next group of fields covers the role of the new user and some information fields.
A role is a set of permissions which dictate what a user can see and do. To assign role(s) to the user:
The available roles are in the Available list on the left. You can scroll down this list, and use the Refine data by field to search for a particular role. There are only three roles applicable, but a user can have one, two or all three roles:
Merchant chargeback analyst.
Merchant user admin access - The administration role.
Merchant reporting and DEU (DEU is the Data Extract Utility).
Scroll through the list of available roles, select the roles you want to add (use the Control key on your keyboard to select multiple roles) and click the right arrow.
The Selected list contains the roles assigned to the user. You can select roles in this list and use the left arrow to move them back to the Available list.
To assign all the roles to a user, click the Select All checkbox next to the Available list and click the right arrow. To deselect all the selected roles from a user, click the Select All checkbox above the Selected list, and click the left arrow.
Note: The fields below the Roles lists are mainly for information:
The Last login field, Last Password Change, Failed Attempts and Reactivate fields are not populated, as you are adding a new user to the system. Ignore these fields.
Click the Inherited checkbox to specify if the user is inherited to lower levels within the organization structure.
The available assignment groups are in the Available list on the left. You can scroll down this list, and use the Refine data by field to search for a particular assignment group.
Scroll through the list of available assignment groups, select the group(s) you want to add (use the Control key on your keyboard to select multiple groups) and click the right arrow.
The Selected list contains the groups assigned to the user. You can select groups in this list and use the left arrow to move them back to the Available list.
To assign all the assignment groups to a user, click the Select All checkbox next to the Available list and click the right arrow. To deselect all the selected groups from a user, click the Select All checkbox above the Selected list, and click the left arrow.
The final set of fields covers the hardware and network connections that the new user will use to operate the system.
In the IP Restriction field, enter the IP (Internet Protocol) address of any restricted devices that you don't want the new user to use to access your system.
Click the Lock IP on Login checkbox to ensure the IP address is locked for the session (this can prevent hijacking).
Select the maximum number of devices the user can use from a particular location from the Max location devices drop-down list.
Enter the Session Initiation Protocol (SIP) extension for this user in the SIP Extension field, or leave the field blank if you don't use SIP.
Enter the SIP user name for the new user in the SIP Username field.
Enter the SIP password for this user in the SIP Password field.
To save the information and create the new user, click the Save button.
To delete a user:
From the Configure > Users screen, use the filter to find the user you want to delete, or scroll through the list of all users.
Click the checkbox to the left of the user's name. This selects the user you will delete.
Click the Delete button at the bottom of the screen.
The warning message You are about to perform a delete operation. Click OK to proceed appears. Click the OK button to delete the user.
To update the details of an existing user:
From the Configure > Users screen, select the user you want to update. Then scroll down to the bottom of the screen and click the update button to display the Users (Update) screen.
The Users (Update) screen is identical to the Users (Add) screen, except that the fields are populated. Make the changes you want. If you are not sure about a field, see Add a user for details.
Click the Save button to save your changes.
To copy an existing user profile:
From the Configure > Users screen, scroll down to the bottom of the screen and click the copy button to display the Users (Copy) screen.
The Users (Copy) screen is identical to the Users (Add) screen, except that the fields are populated. Make the changes you want. If you are not sure about a field, see Add a user for details.
Click the Save button to save your changes.
| Guide feedback?
Email us at: guides@worldpay.com |
   
|
|
© Worldpay 2019, LLC and/or its affiliates. All rights reserved. |