Attaching Support Documents to Your Case
iQ enables you to attach support documents to your chargeback and retrieval request cases. The file upload process is similar to the way you add an attachment to an e-mail message.
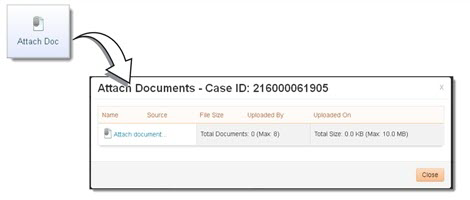
To attach a support document to your case:
-
Navigate to the Dispute Inbox or the Chargeback Case Detail Screen for the desired case.
-
Click the Attach Doc button at the top of the page or from within the Attached Documents panel. An Attached Document dialog box appears when using the button, otherwise a File Upload dialog appears.
-
Using the standard File Upload dialog that opens, navigate to the desired support document.
-
Select the document and click Open.
-
The name of the selected support document now appears in the File Name field, and Chargeback Case Detail page updates the following items:
-
Chargeback Activity Panel - shows an audit trail, which indicates that the file was uploaded.
-
Attached Documents - shows information for the uploaded file.
The Attached Documents panel displays the exact file name you uploaded, even though iQ converted the file to TIFF format. For example, if you upload a file named “document.pdf,” the application converts the file to TIFF format, but the file name displayed in the Attached Documents list retains the name “document.pdf.”
-
-
(Optional) Repeat Step 2 through Step 4 to attach additional support documents.
After you have finished adding all of the required support documentation, move the case to the next queue as described in Responding to a Case.
Viewing an Attached Support Document
Your support documentation stays attached to the case for the duration of the chargeback cycle. You can review support documents attached to any case in your Merchant Queue.
After three months, we archive your support documentation for offline storage.
To view support documents attached to your case:
-
Navigate to the Dispute Inbox or the Chargeback Case Detail Screen for the desired case. The Attached Documents panel displays a list of support documents attached to the case.
The Attached Documents panel displays the exact file name you uploaded, not the converted (to TIFF) file name. For example, if you upload a file named “document.pdf,” iQ displays that file name in the Attached Documents list. If you save this attachment locally, it will be saved as a *.tif file. For example, order0119.pdf is saved as order0119.pdf.tif.
-
Select the desired document link. The Windows Picture and Fax Viewer displays the file.
- If you need to change the document, follow the procedure described next, Replacing an Attached Support Document.
The Windows Picture and Fax Viewer is the default viewer for TIFF files. If you have changed the file association for TIFF files to a different application, that application displays the document. If your application has difficulty displaying the file properly, change the association for TIFF files back to the Windows Picture and Fax Viewer.
Replacing an Attached Support Document
As long as a case is in your Merchant Queue, you can replace any of the attached support documents with another file of the same name.
To replace an existing support document:
-
Navigate to the Dispute Inbox or the Chargeback Case Detail Screen for the case associated with the support document to be replaced.
-
Add the replacement document, as described in Attaching Support Documents to Your Case. A dialog box prompts you to overwrite the original document.
-
Click OK to upload the updated support document.
-
iQ updates the following:
-
Chargeback Activity Panel - shows an audit trail, indicating that the file was updated.
-
Attached Documents - shows information for the updated file.
-
Deleting an Attached Support Document
As long as a case is in your Merchant Queue, you can remove any of the support documents that you attached to that case.
To delete a support document:
-
Navigate to the Dispute Inbox or the Chargeback Case Detail Screen for the desired case.
-
Select the Delete Document button.
-
Specify which documents to delete as follows:
-
To remove one or more documents, check the checkbox associated with the specific support documents.
-
To remove all of the attached support documents, check the checkbox at the top of the column, adjacent to the Document header.
-
-
The Chargeback Activity panel now indicates that the file was deleted.