Portal Users
This topic is applicable to Merchants. Partners/Integrators see Integrator Portal Users topic.
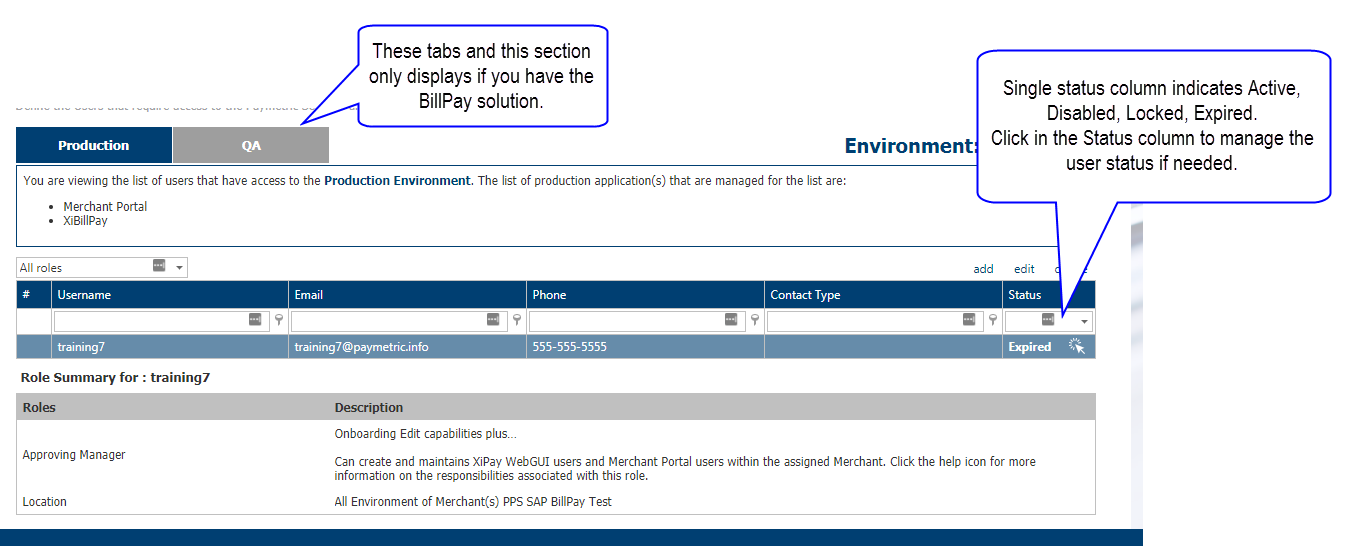
Portal Users are used to maintain all Merchant Portal users, BillPay Portal Merchant users (not Buyer users) and the Functional & Technical Contacts. Review the screenshot for a quick overview of the page. Detailed information on the user types and how to maintain users are in the sections further below.
User types maintained in Merchant Portal
User types maintained in Merchant Portal include Merchant Portal users, BillPay Merchant users, XiPay WebGUI users, and functional and technical contacts.
Merchant Portal users
Merchants have the ability to maintain Users who can access their Merchant Portal within their Organization. Portal Users are maintained by navigating to the Merchant Profile > Users page. The two main Portal User Roles are Portal Admin (PA) and Approving Managers (AM).
The main purpose of the AM is to create and manage XiPay WebGUI Users. Each Merchant should have at least two Approving Managers for backup purposes. The PA can act as an AM. NOTE: The Approving Manager role is not applicable to Partners/Integrators.
Roles and permissions
Merchant Portal users should be limited to individuals with specific business requirements for access. See the Role Information table under Add / Edit a Merchant Portal User section below for more information on Portal User types. Determine which roles you plan to assign before adding the user.
BillPay Merchant users
A BillPay portal Merchant user is created in Merchant Portal using the Merchant Profile > Users page as well. He/she can be given just BillPay Portal access or can also be assigned one of the Merchant Portal Roles. If assigned a Merchant Portal roles as well, he/she receives an email with both the Merchant Portal and BillPay login information.
NOTE: BillPay Buyer users are maintained in the BillPay Portal.
XiPay WebGUI users
These users are maintained in a different area of Merchant Portal. See XiPay WebGUI Users section for more information.
Functional & technical contacts
Contacts are also created on the Users page in Merchant Portal. There are two types of contacts for Incident Management purposes: Functional Contacts and Technical Contacts. These contacts can reside in the portal as non-users or be given specific user permissions within the portal and/or the XiPay WebGUI. Contact types include primary and alternate functional and technical contacts. There is also an Relationship Manager contact.
Add or edit a Merchant Portal user
-
Go to Merchant Profile > Users.
-
Click add or edit to open dialog box and complete the fields. See field descriptions below.
-
User information
-
First Name – User's first name.
-
Last Name – User's last name.
-
Username – Username for Portal - automatically defaults.
-
Email – Email address that will receive the Username and initial password when User is saved. Any notifications associated with this User will be sent to this email address as well.
-
Phone – User's phone number.
-
Alt Phone – Alternate phone number.
-
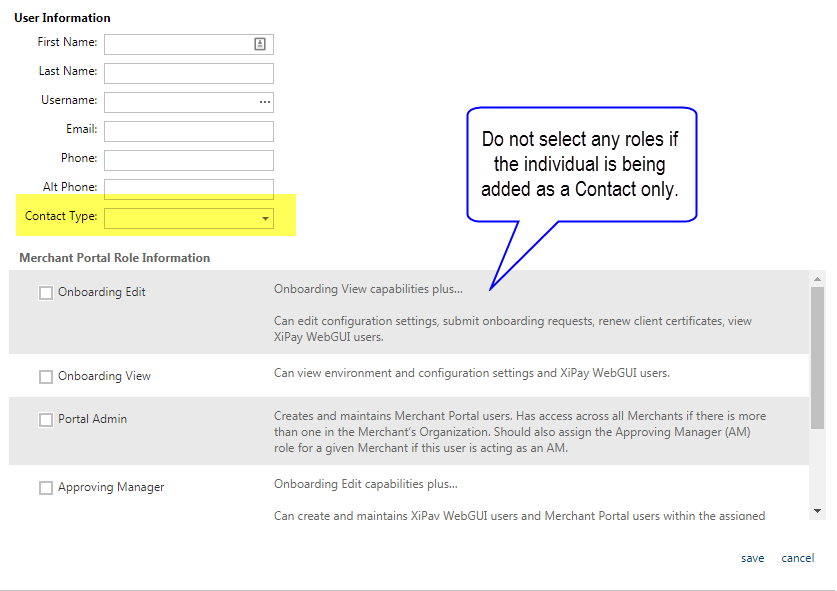
Contact Type – Define as either Primary or Secondary Functional, Technical, or Relationship Manager contact (currently referred to as RM Contact in the Portal). Contacts are required for ongoing operational support of the Paymetric On-Demand Services. You can create a Portal User as a Contact type only and not give him/her access to the Merchant Portal by not selecting any option under Role Information.
-
-
Merchant Portal role information
-
Onboarding Edit Ability to view and edit all configuration settings for the organization. Use this role if you want to give someone the ability to manage XiSecure certificates. Available for Partners, Merchants and Internal users.
-
Onboarding View – Read-only access to configuration settings. Available for Partners, Merchants and Internal users.
-
Portal Admin – Full access to the Merchant Portal across all Merchants within an Organization. Main purpose is to manage the Merchant Portal Users. NOTE: If this user will be performing Onboarding setup requests or XiPay WebGUI user account and password maintenance, he/she should be assigned the Approving Manager role as well to receive all of the email notifications associated with these tasks. Available for Partners, Merchants and Internal users.
-
Approving Manager – Approving Manager per Merchant. The main purpose of this role is create and manage XiPay WebGUI Users. Approving Managers receive all notifications generated by the Merchant Portal including Onboarding and User related items. Available for Merchants and Internal users. This role is not applicable to Partners.
-
View Files – Ability to view files such as the MSA or SOW. Use this role if you only want to give someone the ability to view files but nothing else. Available for Merchants and Internal users. Available for Merchants and Internal users. This role is not applicable to Partners.
-
View Reports – Ability to just view reports in Merchant Portal. For Merchant users, the only reports currently in Merchant Portal are for XiUpdater. If you assign only this permission to a Merchant user and do not have either of these solutions, then he/she will only have the ability to log in to Merchant Portal but will not see anything.
-
Project Management – Used to give access to view all Merchants assigned to a System Integrator Partner. It currently does not receive Onboarding notifications. Only Consultants assigned to a given Merchant with Onboarding Edit permission will receive the notifications. Applicable to Partners/Integrators only.
-
Add or edit a functional or technical contact
You must have at least one individual assigned with all Contact Types before you can submit an Onboarding Setup request. You will receive an error on the Onboarding page if you do not.
-
Navigate to Settings > Merchant Profile > Users.
-
Click add or edit to open dialog box and complete the fields. See field descriptions below.
-
User information
-
First Name – User's first name.
-
Last Name – User's last name.
-
Username – Username for Portal - automatically defaults.
-
Email – Email address that will receive the Username and initial password when User is saved. Any notifications associated with this User will be sent to this email address as well.
-
Phone – User's phone number.
-
Alt Phone – Alternate phone number .
-
Contact Type – Type of Functional, Technical, or Relationship Manager contact (currently referred to as RM Contact in the Portal) Contacts are required for ongoing operational support of the Paymetric On-Demand Services. You can create a Portal User as a Contact type only and not give him/her access to the Merchant Portal by not selecting any option under Role Information.
-
-
Role information
-
Do NOT select any role for this user if they are to be a Contact only. He/she will not receive a Merchant Portal login if no role is selected. They will be designated as Contacts only in your Merchant Profile for ongoing reference.
-
If you want the Contact to also have be ability to maintain Portal and XiPay WebGUI Users, assign Approving Manager role.
-
If you would like to give the Contact a view-only Merchant Portal login, assign Onboarding View (which gives access to all configuration.
-
Add or edit a BillPay Merchant user
-
Go to Settings > Merchant Profile > Users.
-
Click add or edit to open dialog box and complete the fields. See field descriptions below.
User information
-
Complete the following fields.
-
First Name – User's first name.
-
Last Name – User's last name.
-
Username – Username for Portal – automatically defaults.
-
Email – Email address that will receive the Username and initial password when User is saved. Any notifications associated with this User will be sent to this email address as well.
-
Phone – User's phone number.
-
Alt Phone – Alternate phone number.
-
Contact Type – Define as either Primary or Secondary Functional, Technical, or Relationship Manager contact (currently referred to as RM Contact in the Portal). Contacts are required for ongoing operational support of the Paymetric On-Demand Services. You can create a Portal User as a Contact type only and not give him/her access to the Merchant Portal by not selecting any option under Role Information.
-
-
Merchant Portal role information – You will only select roles from this section if you want to also make this individual a Merchant Portal user as well. If you do not select any permissions from this section, the user will only be able to log into the BillPay Portal.
-
BillPay role information – Select either the Production or QA tab, then select the BillPay tab and select the desired roles to assign to the user. Review BillPay Custom Roles if you are implementing those instead.
-
Reporting – View all BillPay settings in assigned environment.
-
Business Admin – Edit all BillPay settings and view reports in assigned environment.
If you are implementing BillPay Activity Reporting, then you must use Custom Roles. See BillPay Activity Reporting for end-to-end setup process for that report.
-
Enable, disable, or unlock Merchant or BillPay users
-
Go to Settings | Merchant Profile | Users.
-
Select a User status:
-
Active – The user is enabled and has no restrictions that should affect log in.
-
Disabled – The user was manually disabled and will not be able to log in.
-
Locked – Merchant Portal Users are locked-out after 3 failed login attempts. The lock is automatically removed within 60 minutes; however, you can force an unlock using the procedure below.
-
Expired – Merchant Portal Users expire after an 80-day period of inactivity.
-
Manage user status
-
Click on the desired User to select. The User is highlighted when selected.
-
Click the status column to initiate available action.
-
Depending upon which status the user is in, you are asked to confirm if you want to activate, disable or unlock the user.
-
Click ok to confirm.
Delete user
Merchant Portal Users can be deleted.
-
Go to Settings > Merchant Profile > Users.
-
Choose either Production or QA tab if applicable.
-
Click on the User to select. The User is highlighted when selected.
-
Click delete. The User's status is updated and is removed from the list.
-
Select Show Disabled Users checkbox if you want to display the disabled Users.