The DRC puts disputes into several queues.
Use the Queue screen to access and manage current disputes and the disputes that will be your future work.
To display the Queue Dashboard screen:
From the Landing screen, select Queue. The Queue screen appears.
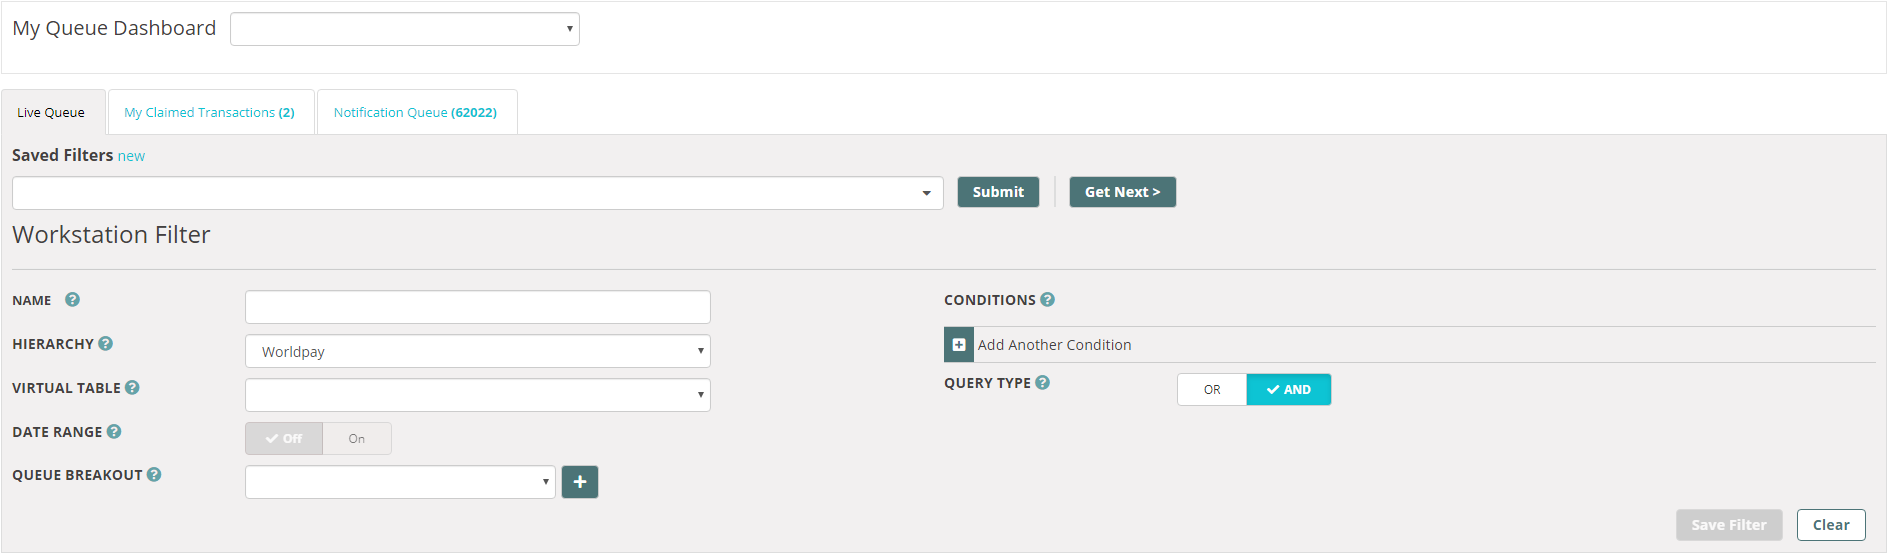
The screen contains a My Queue Dashboard drop down list where you can select the queue you want.
The main part of the screen contains three tabs:
Live Queue (explained here)
My Claimed Transactions (explained here)
Notification Queue (explained here)
Next to the tab titles is a number in brackets; this number is the total number of disputed transactions in the queue.
Use this filter to find and display disputes that you need to work on. To use the filter:
From the Landing screen, click Queue . The Queue screen appears.
If you have previously saved a filter, select the filter you want from the Saved Filters drop-down list. If you want to use the saved filter without any changes, click the Submit button. The results of the filter appear. See the Filter Results section for information on the results and how to work with them.
Select the hierarchy you want from the Hierarchy drop-down list. Some organisations may only have a single hierarchy of data.
Select the table of disputes you want from the Virtual Table drop-down list. This will always be Worldpay.
You can turn On the Date Range as part of your search:
Select the type of date from the drop-down list.
Select a time period in the Past or Future, or a Date Range. For example you can select a time period of five days after the disputed date.
Choose what Queue Breakout to use from the drop-down list. This is a set of conditions such as Time in Queue and Disputed Amount.You can also add Conditions to further filter the disputes. See the Conditions section below for more information.
Click Submit. You can also click Get Next Transaction to retrieve the next order in your queue based on the filter.
This is an optional part of the Workstation filter screen where you can add extra conditions to make your search more precise. The conditions are:
FILTER - This is a drop down list of various conditions. Most are self explanatory. Some need a description:
Network - This is the scheme such as Visa, Mastercard, American Express and so on.
Load date - This is the date that the disputed transaction was loaded onto the system.
Merchant number - This is a unique number that identifies merchants.
Processor - This is always Worldpay.
Reason Code - This is the reason why the transaction is being disputed, in the form of an industry standard reason code.
These are standard database enquiry operators. There is an Is Blank operator if you don't want to put a value in the Value field. The value must be exact, for example Visa, not VISA.
To add another condition, click the Add Another Condition button. You can add as many additional conditions as you want from the filter list.
The Operator and Value fields are mandatory. To reset the Conditions filter, click the Delete button (it has a picture of a bin) to the right of the Value field.
The difference between query type Any and All is that for example if you selected the following:
Disputed date
And
Transaction currency equal to GBP
If you then select All, the system finds transactions that meet both of those criteria. If you select Any the system finds transactions that only have to match one of the criteria. So in the example above, the system would select transactions that are greater than £100 in value, regardless of the date, and transactions that occurred on the date, no matter their value.
To display the next transaction with the same workstation filter settings, click the Get Next Transaction button.
After you click the Submit button, there is a pause while the system processes the disputes and then displays them on the screen. Here's an example of a filter results screen:

To see the results in detail, click one of the numbers in the results areas. The disputed transactions are organised into several queues.
| Guide feedback?
Email us at: guides@worldpay.com |
   
|
|
© Worldpay 2019, LLC and/or its affiliates. All rights reserved. |