The fields in this area of the Data Extract (Add) screen control the various filters, which are ways to define the data with more precision.
To add a filter, click Add a new filter set. The filter popup appears.

When you have added a filter, it appears in the Filters part of the Data Extract (Add) screen. See the screenshot below, which contains dummy data:

To delete a filter:
Click the bin icon on the filter summary (see screenshot above).
There are three types of filter:
Scoring filters - Ignore these as they are for fraud detection capability which is not part of the WDRC system
Column filters - These control the data that appears in a specific column, or columns of the new report
Status filters - This concern the status of the various transactions that appear in the new report
These filters control the various columns in the new report.

This is a filter that controls the amounts of various things that will appear or be excluded from the new report. To use this filter:
Select the filter statement from the drop down list and select the operator from the drop down list. Then select the quantity.
Use the Include/Exclude switch to control whether the rule includes or excludes the data from the new report.
When you're happy with the rules selected, click Save Filter Set. You return to the Data Extract Definition screen. The filters you set are summarised in the Filters area. Alternatively, click Save and Add another filter to stay on the Amount Filter popup. The filter is saved and you can make a new column filter.
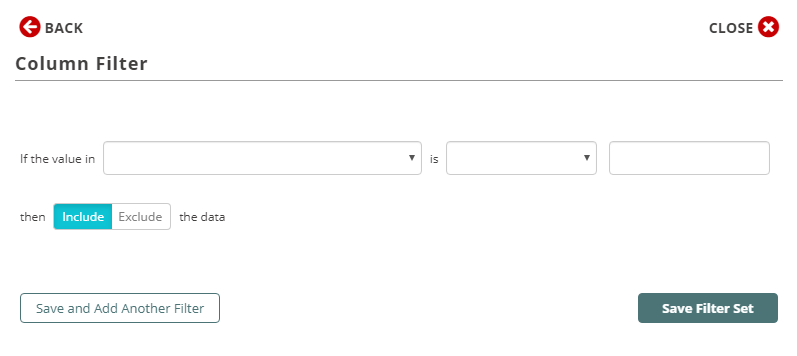
This filter controls the data that appears under the various column headings in your new report. To use this filter
Select the column heading from the drop down list and select the operator from the drop down list. Then select the value.
Use the Include/Exclude switch to control whether the rule includes or excludes the data from the new report.
When you're happy with the rules selected, click Save Filter Set. You return to the Data Extract Definition screen. The filters you set are summarised in the Filters area. Alternatively, click Save and Add another filter to stay on the Column Filter popup. The filter is saved and you can make a new column filter.

This filter uses dates to control the data that appears in your new report. To use this filter
Select the date-related column from the drop down list and select the operator from the drop down list.
Enter the date from the calandar. You can also add a time if necessary.
Use the Include/Exclude switch to control whether the rule includes or excludes the data from the new report.
When you're happy with the rules selected, click Save Filter Set. You return to the Data Extract Definition screen. The filters you set are summarised in the Filters area. Alternatively, click Save and Add another filter to stay on the Column Filter popup. The filter is saved and you can make a new column filter.

This filter is similar to the Column Filter above, except that the columns are system related, for example ascoring_score. To use this filter:
Select the column heading from the drop down list and select the operator from the drop down list. Then enter the value.
Use the Include/Exclude switch to control whether the rule includes or excludes the data from the new report.
When you're happy with the rules selected, click Save Filter Set. You return to the Data Extract Definition screen. The filters you set are summarised in the Filters area. Alternatively, click Save and Add another filter to stay on the System Column Filter popup. The filter is saved and you can make a new column filter.
![]()
Use this filter to include or exclude specific transactions from the report. To use this filter:
Enter the transaction ID, or transaction IDs you want into the blank field.
Click Save Filter Set. You return to the Data Extract Definition screen. The filters you set are summarised in the Filters area. Alternatively, click Save and Add another filter to stay on the Transaction ID Filter popup. The filter is saved and you can make a new column filter.
These filters control the various statuses of the transactions in the new report.

This filter controls data in the Notification Queue tab. To use it:
Use the radio button to chose whether if the Followup data is blank then include or exclude it.
If the Followup data is not going to be blank, set the radio button and then select the conditions from the Available list to the Selected list.
When you're happy with the rules selected, click Save Filter Set. You return to the Data Extract Definition screen. The filters you set are summarised in the Filters area. Alternatively, click Save and Add another filter to stay on the System Column Filter popup. The filter is saved and you can make a new status filter.
Ignore this filter as the WDRC system does not include fraud detection functionality.

This filter controls data on how transactions were resolved. To use it:
Use the radio button to chose whether if the resolution data is blank then include or exclude it.
If the resolution data is not going to be blank, set the radio button and then select the resolution types from the Available list to the Selected list.
When you're happy with the rules selected, click Save Filter Set. You return to the Data Extract Definition screen. The filters you set are summarised in the Filters area. Alternatively, click Save and Add another filter to stay on the System Column Filter popup. The filter is saved and you can make a new resolution filter.
| Guide feedback?
Email us at: guides@worldpay.com |
   
|
|
© Worldpay 2019, LLC and/or its affiliates. All rights reserved. |