Create a new customised report and set when the report runs and how often it runs.
Follow the instructions below:
From the Reports menu, select Data Extract. The Data Extract Definition screen appears.
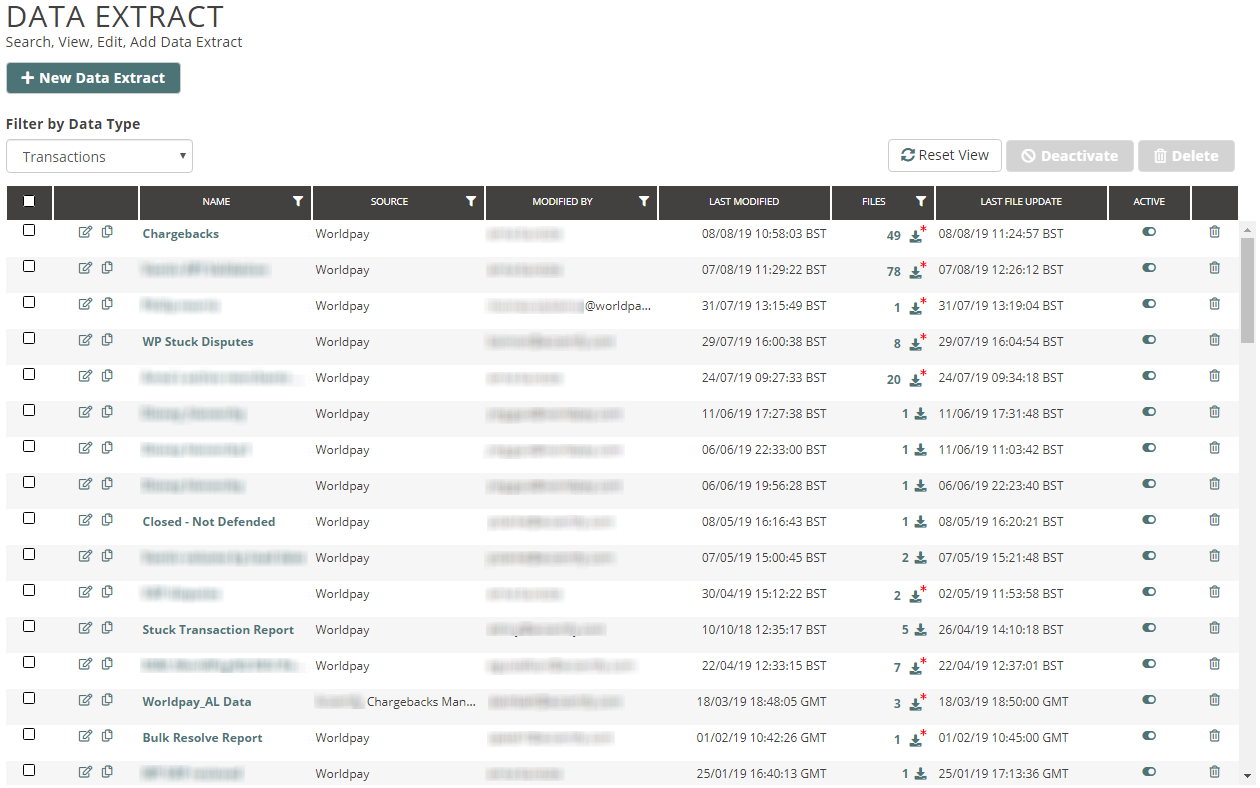
Click the + New Data Extract button on top left of the screen. The Data Extract (Add) screen appears.
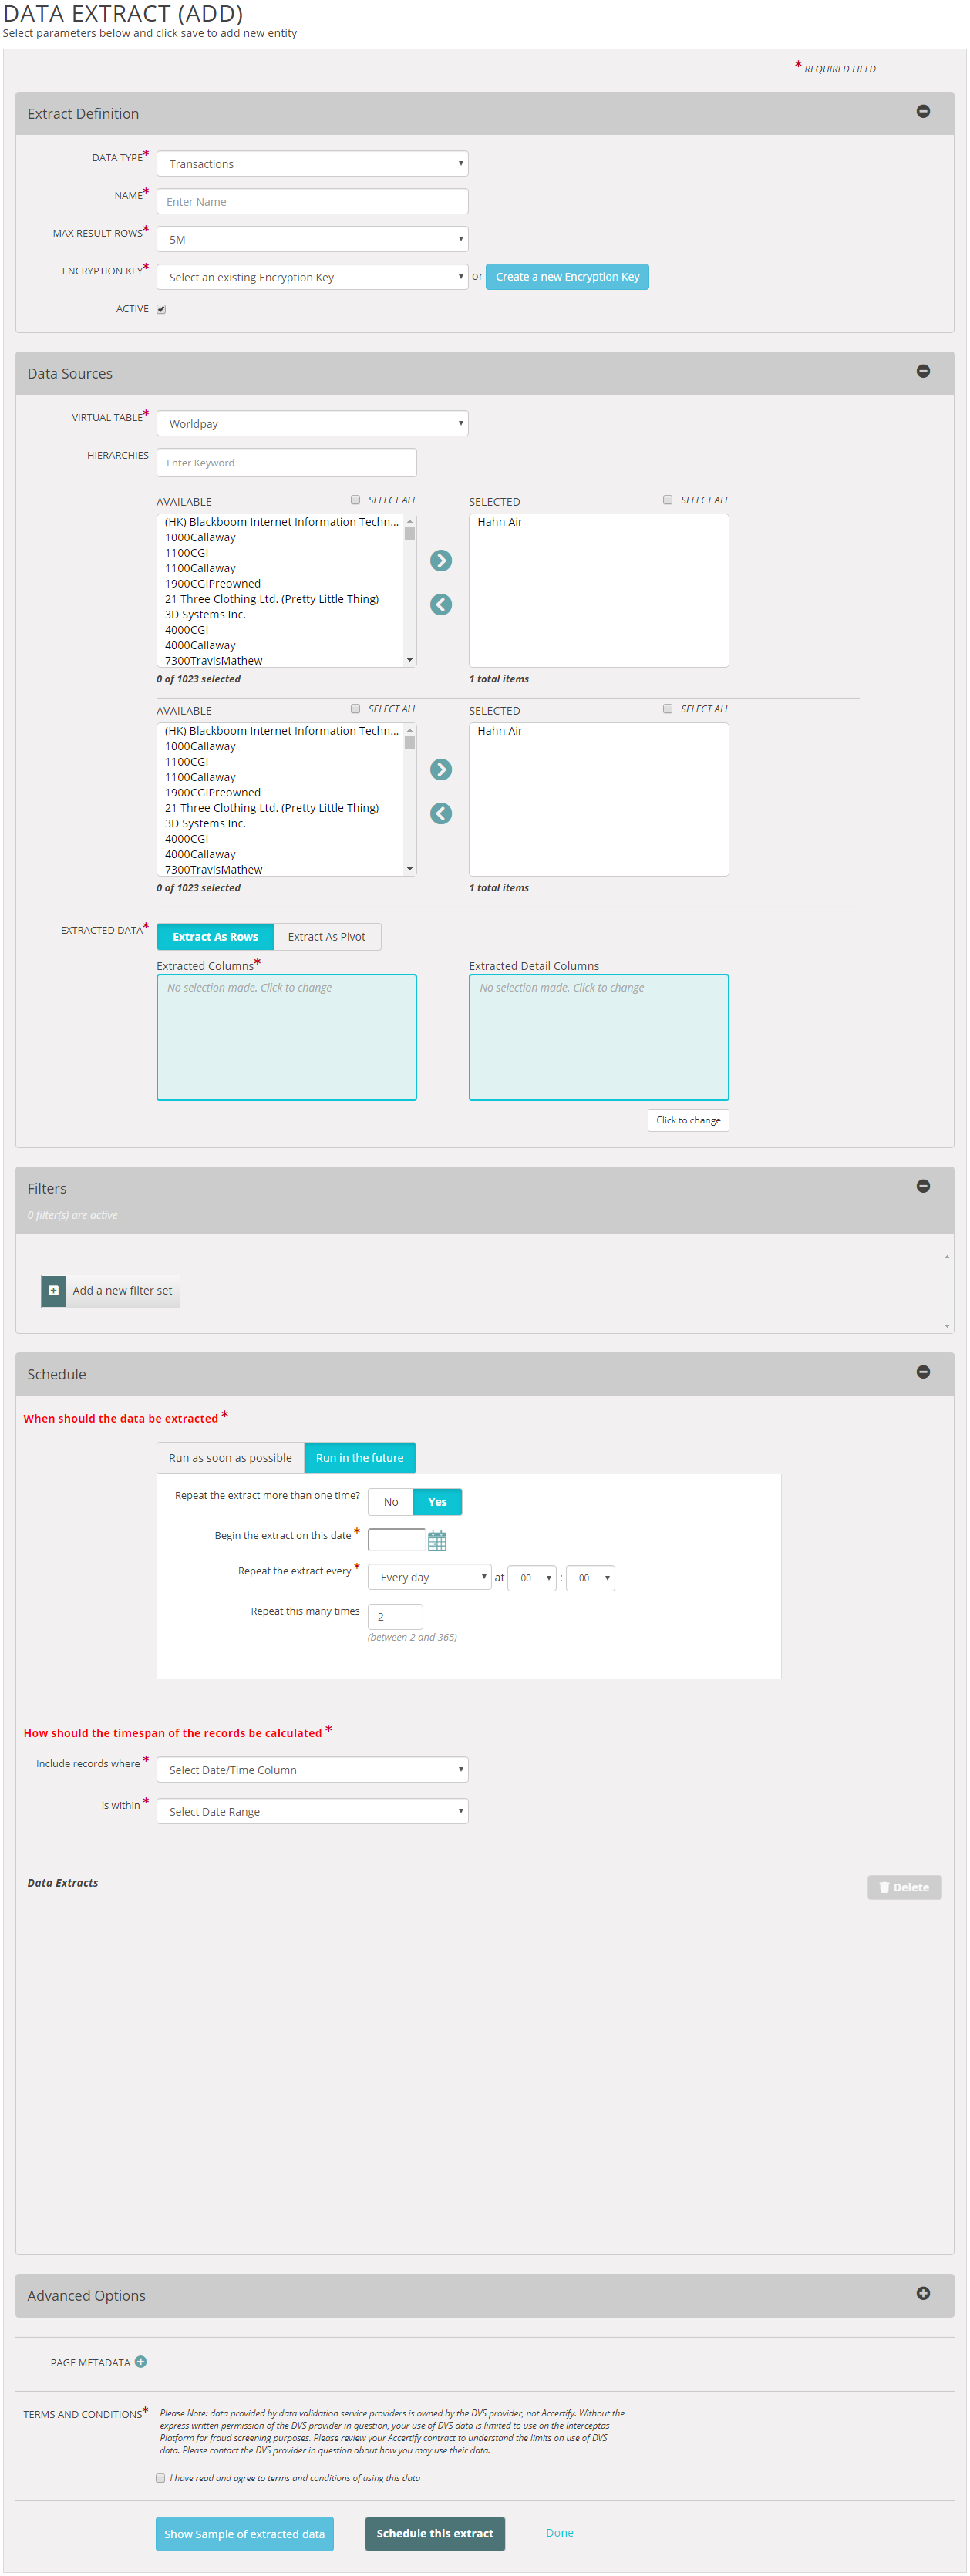
This screen is divided into several areas, at the top is the Extract Definition area.
The fields in this area set the parameters for the data you will extract to make the report. The fields are all compulsory, except the Active checkbox. The fields are:
Data Type - This is a drop-down list with three possible data types:
Negative Values Ignore this option, it doesn't apply to dispute management.
Resolution History This gives you the status of the transactions depending on the action taken on the chargeback (for example, accept chargeback)
Transactions This covers all the disputed transactions. Use the Active checkbox to search only active data, untick the checkbox to search all the data.
Name - Use this field to enter a name for your report
Max result rows - Use this drop-down list to set the size of your report. The minimum size is a report that is 100 rows long, the maximum size is unlimited, which can be over one million rows.
Encryption key - Select an existing encryption key from the drop-down list, or click the Create a new Encryption Key button. See the Create a new encryption key section below for information on how to create a new encryption key.
Active - This is a checkbox that defines the data that will appear in your report. If the Active checkbox has a check (tick) in it, then the report will only feature active data. If the Active checkbox is blank, the report will include all the data, active and closed or inactive.
Each report must have an encryption key. This key can be an existing key, or you can create a new key.
To create a new encryption key for the new report:
Click the Create a new Encryption Key button. The Create a new Encryption Key screen appears.
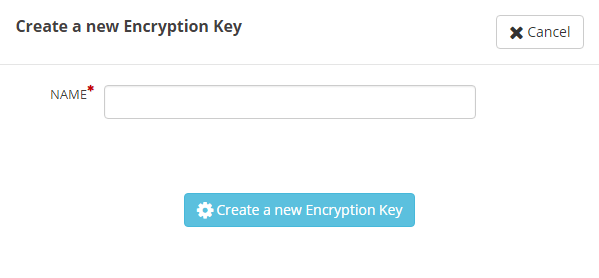
Enter a name for the encryption key in the Name field.
Click the Create a new Encryption Key button.
A confirmation screen appears, click the OK button to return to the Data Extract Definition (Add) screen. The new encryption key name appears in the Encryption Key field at the top of the list of encrypted keys.
The fields in this area define the areas the system searches to collect the data. The fields are:
Virtual table - This must always be the default setting, Worldpay.
Hierarchies - Data in the system is organised into a hierarchy or hierarchies. How the hierarchies are organised depends on how your system is set up. Some organisations will have a single hierarchy, others with have many. See the Select the hierarchys section below for information on how to select the hierarchies for your report.
To select the hierarchies that contain the data for your report:
The available hierarchies are in the Available list on the left. You can scroll down this list, and use the Refine data by field to search for a particular hierarchy or hierarchies.
Scroll through the list of available hierarchies, select the hierarchies you want to include in your report. Use the Control key on your keyboard to select multiple hierarchies and click the right arrow.
The Selected list contains the hierarchies which contain the data that will appear in the report. You can select hierarchies in this list and use the left arrow to move them back to the Available list.
To assign all the hierarchies to your report, click the Select All checkbox next to the Available list and click the right arrow. To deselect all the selected hierarchies from the report, click the Select All checkbox above the Selected list, and click the left arrow.
Extracted Data - These fields control what the report looks like when it's produced. There are two main choices, to output the data as rows, or to extract as a pivot table.
This is the default option for your new report. The system presents the data in a series of rows with several columns. There are two types of column, the Column and the Extracted Detail Column. To select the columns you want:
Click the Extracted Columns box. The Extracted Columns screen appears.
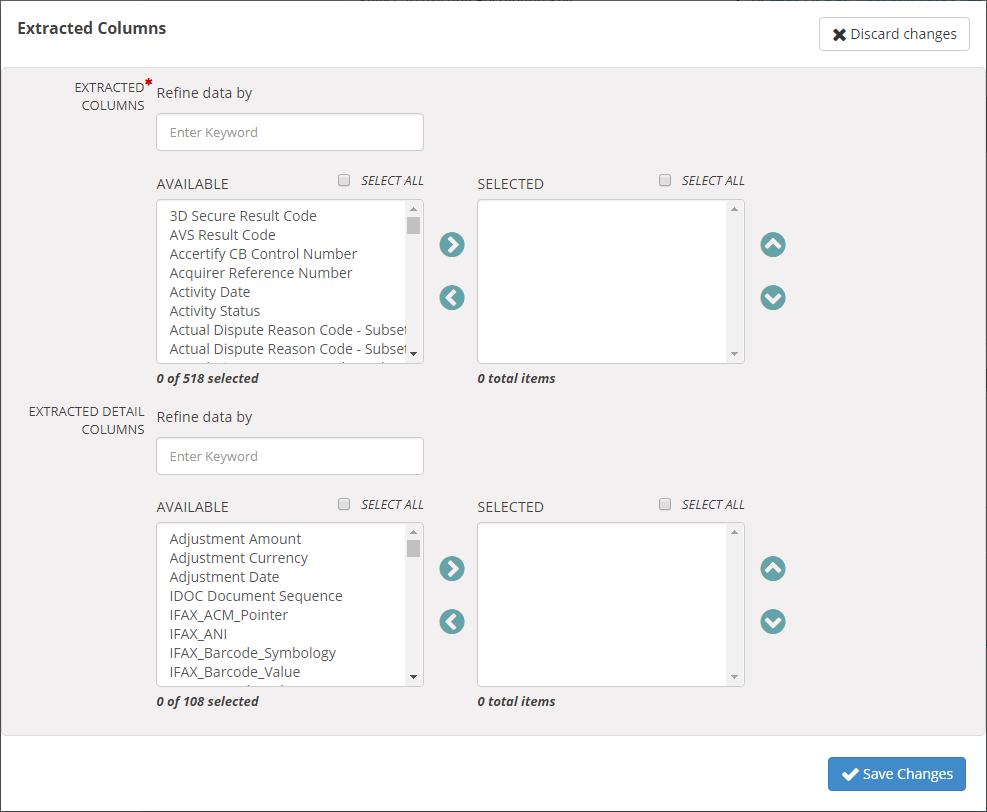
The available columns are in the Available list on the left. You can scroll down this list, and use the Refine data by field to search for a particular column or columns.
Scroll through the list of available columns, select the columns you want to include in your report. Use the Control key on your keyboard to select multiple columns and click the right arrow.
The Selected list contains the columns that will appear in the report. You can select columns in this list and use the left arrow to move them back to the Available list.
To assign all the columns to your report, click the Select All checkbox next to the Available list and click the right arrow. To deselect all the selected columns from the report, click the Select All checkbox above the Selected list, and click the left arrow.
The procedure (steps 1 to 4) is identical for the Extracted Detail Columns.
Click the Save Changes button to confirm your choice of columns to include in the report. You return to the Data Extract Definition (Add) screen. The columns you selected appear in the blue Extracted Columns and Extracted Detail Columns boxes on the screen.
If you change your mind or see a mistake in your choice of columns, click the Click to change button to display the Extracted Columns screen.
This is an alternative way to present your report, in the form of a pivot table. A pivot table allows you to reorganise and summarise selected columns and rows of data in a database to create exactly the type of report you want. To use a pivot table to set up the report:
Click the Extract As Pivot button. Three boxes appear, called Rows, Columns and Values.
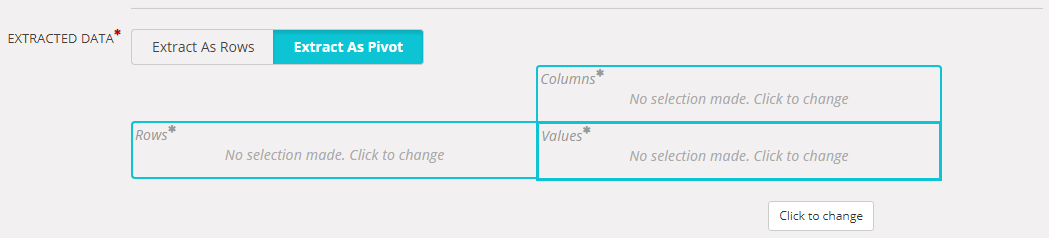
Click in one of the boxes, for example the Rows box. The Pivot Configuration screen appears.
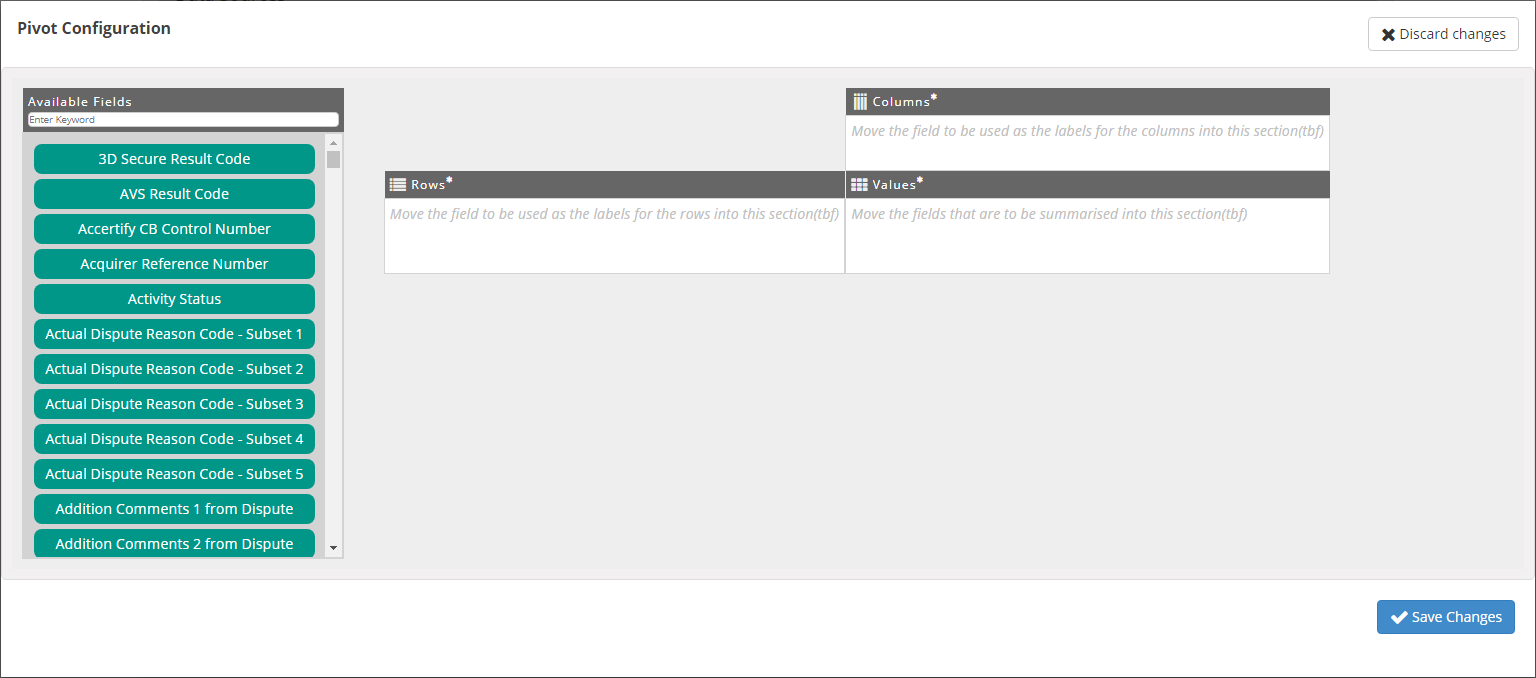
Drag and drop a field from the Available Fields list into the Rows, Columns or Values boxes. You must drag at least one field into each box.
Click the Save Changes button to confirm your choice of columns, rows and values to include in the report. You return to the Data Extract Definition (Add) screen. The configuration you selected appears in the blue Rows, Columns and Values boxes on the screen.
If you change your mind or see a mistake in your choice of columns, click the Click to change button to display the Pivot Configuration screen.
There are several filters you can apply to a new report. See the Filters topic.for details.
The fields in this area control when the report runs.
You can also control the time range of the records that feature in your report. For example, you can restrict your report to records from 2019 only.
To run the report as soon as possible:
Click Run as soon as possible.
To run the report in the future:
Click Run in the future. Extra fields appear.
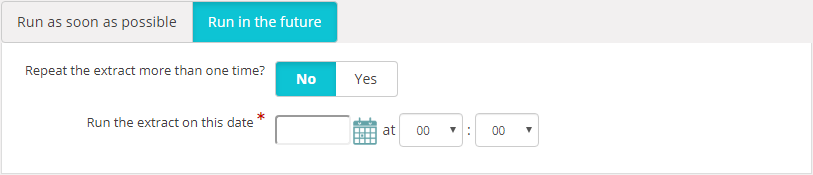
To run the report once at a specific time:
Use the calendar to give the date in the Run the extract on this date field.
Specify a time, otherwise the report runs 1 second after midnight on the date you specified.
To run the report at regular intervals:
Click Yes on the Repeat the extract more than one time? field. Extra fields appear.
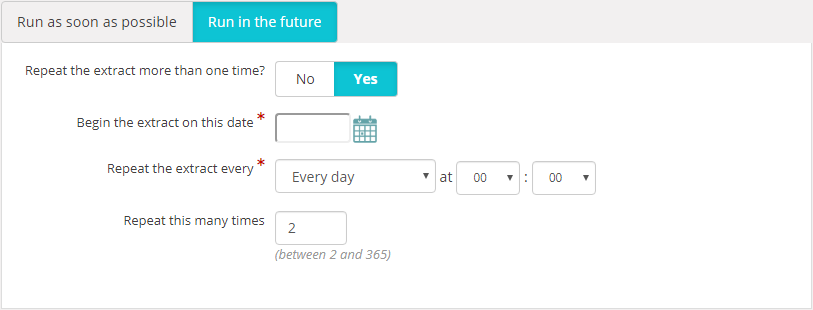
Use the calendar to enter the date you want the first report to run in the Begin the extract on this date field.
Use the Repeat the extract every field to select the day and time of the intervals.
Enter the number of repetitions in the Repeat this many times field.
Note: The maximum total time for a report repetition is one year. If you want your report to run for more than one year, you will have to confirm these settings once each year.
Report records timespan
To set the time span and the trigger event (for example, the load date):
Select the trigger event from the include records where drop down list.
Select a time range from the is within drop down list.
This section of the screen has some general settings:
Notification Emails - The system sends a notification to the email address specified in this field. The default email address is the email address which is your user name or in your user profile. To change the email address, enter a new email address in the field
Delivery Location - Shows you the location of the report, once the system has run the report. You cannot edit this field
Use descriptions for column names - To use long form column names in the report, click the box
Scheduling timezone - Select the timezone you want from the drop down list
Data Timezone - Select the timezone that governs the data in your report
Page Metadata - Gives you some basic information about the Data Extract (Add) screen
To complete the report you've just created, do the following:
Click the checkbox next to the statement I have read and agree to the terms and conditions of using this data.
An optional step is to click the Show Sample of extracted data button. The sample screen appears.
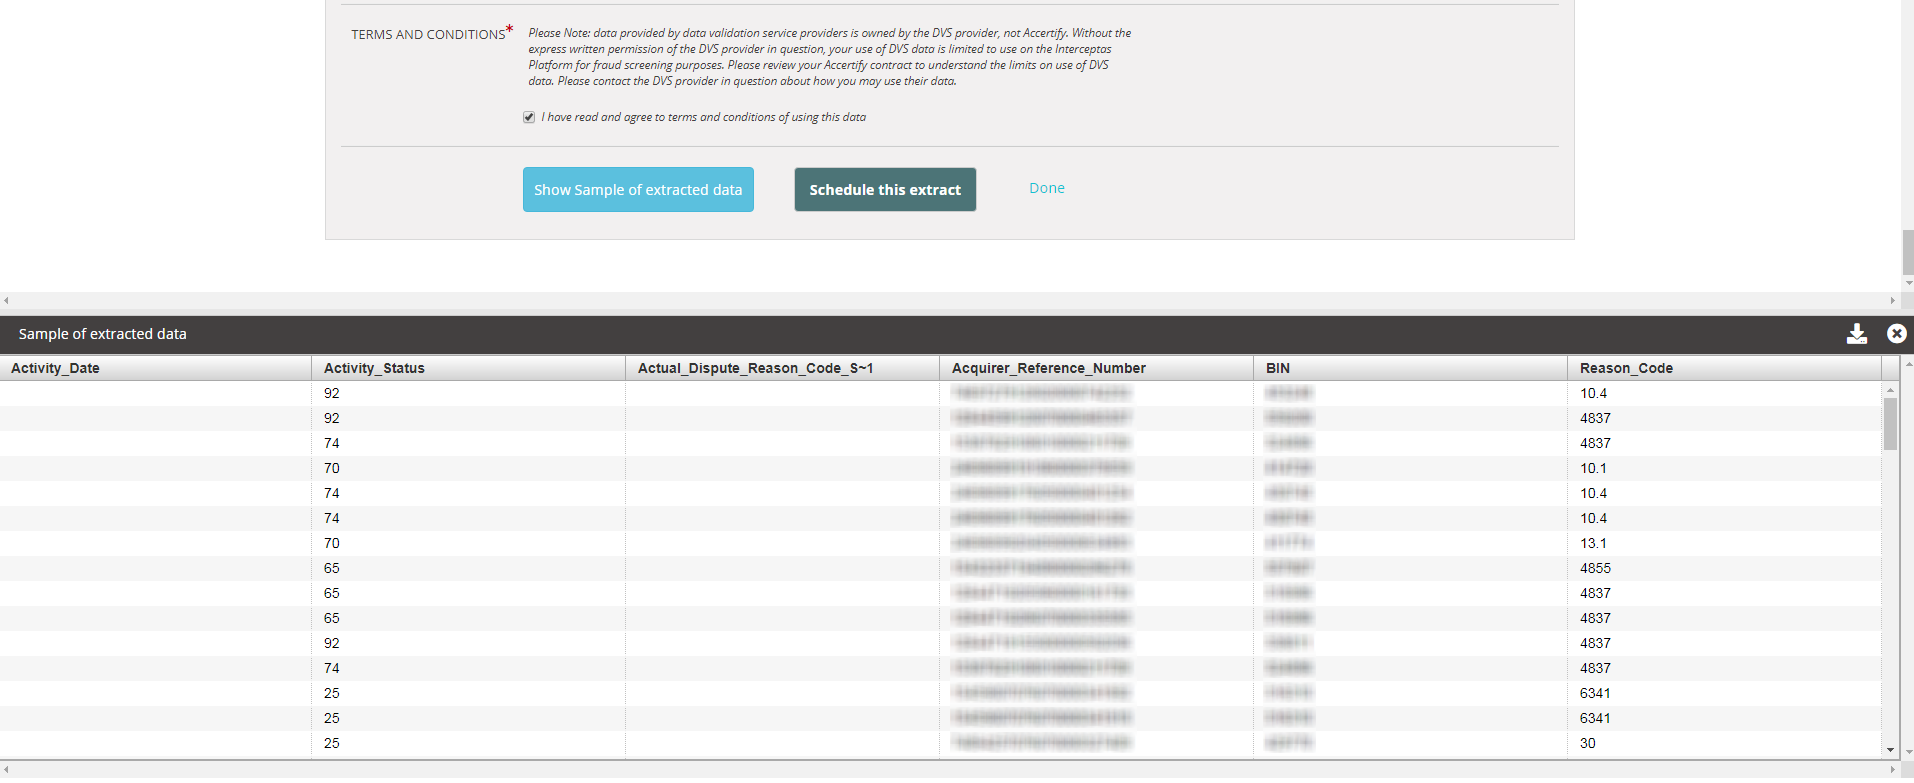
Click Schedule this extract or Done. You return to the Data Extract screen with the various reports listed. When the report you just created runs, the system sends you a confirmation email. The email contains some basic information about the report, including its file name, hierarchy, and SFTP (Secure File Transfer Protocol) path.
Note: You cannot change the data type of the report, or the encryption key associated with the report.
| Guide feedback?
Email us at: guides@worldpay.com |
   
|
|
© Worldpay 2019, LLC and/or its affiliates. All rights reserved. |