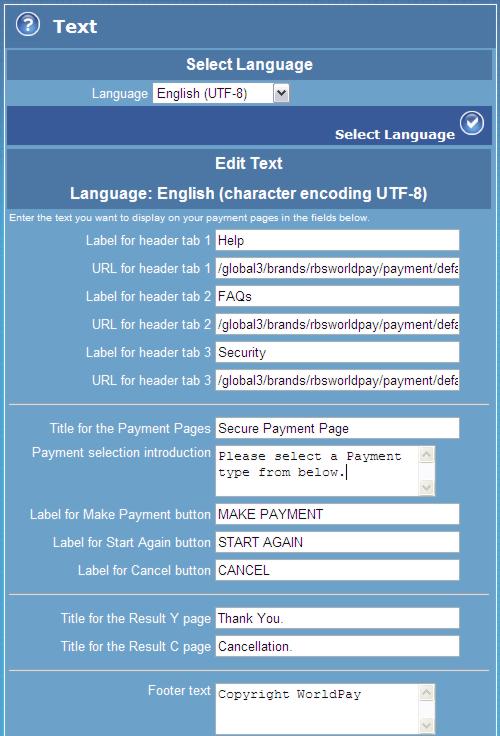
The Text page enables you to change the text that is displayed in the payment service pages, and to select the default language used to display text.
To view where these messages are displayed in the payment service pages, refer to Labelled payment page - example.

The table below describes the fields displayed in the Text page. When you have made your changes, select the Add Text button to apply them to the payment service pages.
|
Label/field |
Description |
||
|
Select language - this area of the page only appears if you have enabled another language, using the Languages page. |
|||
|
Language listbox |
This listbox displays the languages you've enabled, as well as any languages you have created for this installation. Select from the listbox the default language to be used in the Payment Service pages, then choose the Select Language tick button.
|
||
|
Edit text - use these fields to change the text to be displayed in the Payment Service pages (for the language selected). |
|||
|
Payment Page header area |
The following fields relate to the header area. The header links are displayed at the top-left corner of the Payment and Payment Selection pages. The links, Help, FAQs and Security, enable the display of standard files. You can customise the standard links we supply, and you can insert extra links by changing the header file for the Payment pages, for details please refer to Header and Footer. |
||
|
Label for header tab 1 |
Enter the text you want to display for the first tab in the header at the top of the Payment Service pages. The default label is 'Help'. |
||
|
URL for header tab 1 |
Enter the URL to link to from the first tab. Note that this should be the path to a file you have uploaded to your installation. The default URL is 'Help'. |
||
|
Label for header tab 2 |
Enter the text you want to display for the second tab in the header at the top of the Payment Service pages. The default label is 'FAQs'. |
||
|
URL for header tab 2 |
Enter the URL to link to from the second tab. Note that this should be the path to a file you've uploaded to your installation. The default URL is 'FAQs'. |
||
|
Label for header tab 3 |
Enter the text you want to display for the third tab in the header at the top of the Payment Service pages. The default label is 'Security'. |
||
|
URL for header tab 3 |
Enter the URL to link to from the third tab. Note that this should be the path to a file you've uploaded to your installation. The default URL is 'Security'. |
||
|
|
|
||
|
Payment Page container area - the following fields relate to text in the payment container area, where the payment fields/contents are displayed. |
|||
|
Title for the Payment Pages |
Enter the text you want to display as the title for the Payment Service pages. This will replace the default 'Secure Payment page'. |
||
|
Payment selection introduction |
Enter the text you want to display as an introduction appearing only on the Payment Selection page. This text appears beneath the Payment Selection Page title and is specific to the Payment Selection page. Please refer to Payment Selection page - example. |
||
|
Label for Make Payment button |
Enter the text you want to appear for the Make Payment button. This button is displayed at the bottom-right of the Payment Page. |
||
|
Label for Start Again button |
Enter the text you want to appear for the Start Again button. This button is displayed near the bottom-left of the Payment Page. |
||
|
Label for Cancel button |
Enter the text you want to appear for the Cancel Purchase button. This button is displayed beneath the Start Again button. |
||
|
Result Page area - the following fields relate to the result pages, which are displayed to the shopper after they have made or cancelled a transaction. |
|||
|
Title for the resultY page |
Enter the text you want to display as the title for the resultY.html page, which is returned when the payment is successfully made. |
||
|
Title for the resultC page |
Enter the text you want to display as the title for the resultC.html page, which is returned when the shopper cancels their attempt at payment. |
||
|
Footer area |
The following field is displayed at the bottom of the Payment Page |
||
|
Footer text |
Enter the text you want to display in the footer at the bottom of the Payment Page. |
||
|
Add Text button |
Select this button to apply your changes to the Payment Page. |
||