Business Gateway Customising (Standard): Home > The Payment Page editor > Editor menu items > Page description - File Management
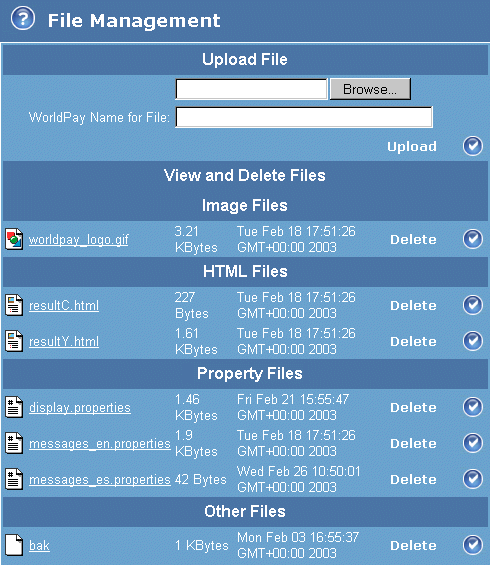
The File Management page enables you to manage your payment service page files. You can browse for files on your PC/network and then upload them to your installation on the Worldpay payment service.
Typically, you will use this option to load image files you want to use as buttons and background images, but it is also used for managing the property files associated with advanced customisation.
Some files are automatically added to your installation when you make changes to your payment service pages using options from the payment page editor. For example, when you add a language version of the payment page, the relevant property files are automatically copied into your installation.
For more information on payment service page files, please refer to the Customising Guide (Advanced).

Figure: The File Management page
The table below describes the fields displayed in the File Management page.
|
Label/field |
Description |
||
|
Upload files |
|||
|
Browse |
Use this option to explore your PC/network and select the file that you want to upload. |
||
|
Worldpay Name for file |
Enter an appropriate name for the uploaded file: the uploaded file will be renamed accordingly. For more details, please refer to the section below: Filenames when uploading files. |
||
|
Upload |
Use this option to upload files from your PC/network to your installation on the Worldpay payment service. For example, to upload images that you want to use for buttons or as backgrounds on your Payment Service pages. To replace an existing image, or any other file used within your installation, you should upload the file using the same name as the file that is to be replaced. The uploaded file then overwrites the current file. For more details, please refer to the section below Filenames when uploading files.
|
||
|
View and delete files |
|||
|
Opening a file |
To open a file, select its name in the list, the file will open in your browser. You can now save it to your PC and make your desired changes. You can then use the Payment Page editor to upload the changed file back to your Test installation. |
||
|
Deleting a file |
To delete a file, select the Delete button.
|
||
|
File types |
|||
|
Image files |
These are files with file extension: .gif, .jpg, .png. |
||
|
HTML files |
These are files with file extension: .html. Please avoid using the extension .htm, as this extension can cause server issues. |
||
|
Property files |
These are parameter files with file extension .properties, used by our systems. Some property files are automatically added to your installation. For example, when you use the Language Selection page to add a version of the Payment Service pages in a language other than English, a file called messages_*.properties (where * is a two character code representing a language, for example 'es' for Spanish) is added to your installation. For more details, refer to Customising the Property Files in the Customising Guide (Advanced).
|
||
|
Other files |
These are any files of a type not included in the Image, HTML and Properties sections.
|
||
When you upload a file to your installation using the File Management option, you can enter the filename using the Worldpay Name for File field. When you enter a filename the uploaded file is renamed, if required, by our systems.
If you upload:
An image file, such as fileName.gif or fileName.jpeg, then the file is saved as an image, within the Image Files list.
An html file, such as fileName.html, then the file is saved as an html file, within the HTML Files list.
A properties file, either display.properties or messages_*.properties, (where * is a two-character code representing a language, for example 'es' for Spanish), then the file is saved as a property file, within the Property Files list.
A file with an unrecognised extension, when the file is saved within the Other Files list.
However, if you upload a file named fileName.ext, but you enter the name of a standard installation file in the Worldpay Name for File field, then the contents of the uploaded file will replace the standard file.
For example, if you browse to upload a file on your PC named resultOK.html, but enter resultY.html into the Worldpay Name for File field, then the resultOK.html file will be uploaded to your installation with the name changed to resultY.html, and so will replace the current version of the resultY.html file.