User Administration - DRAFT
With the appropriate permissions, a designated administrative user in your organization can perform certain functions from the iQ User Administration screen (User Administration Screen), including:
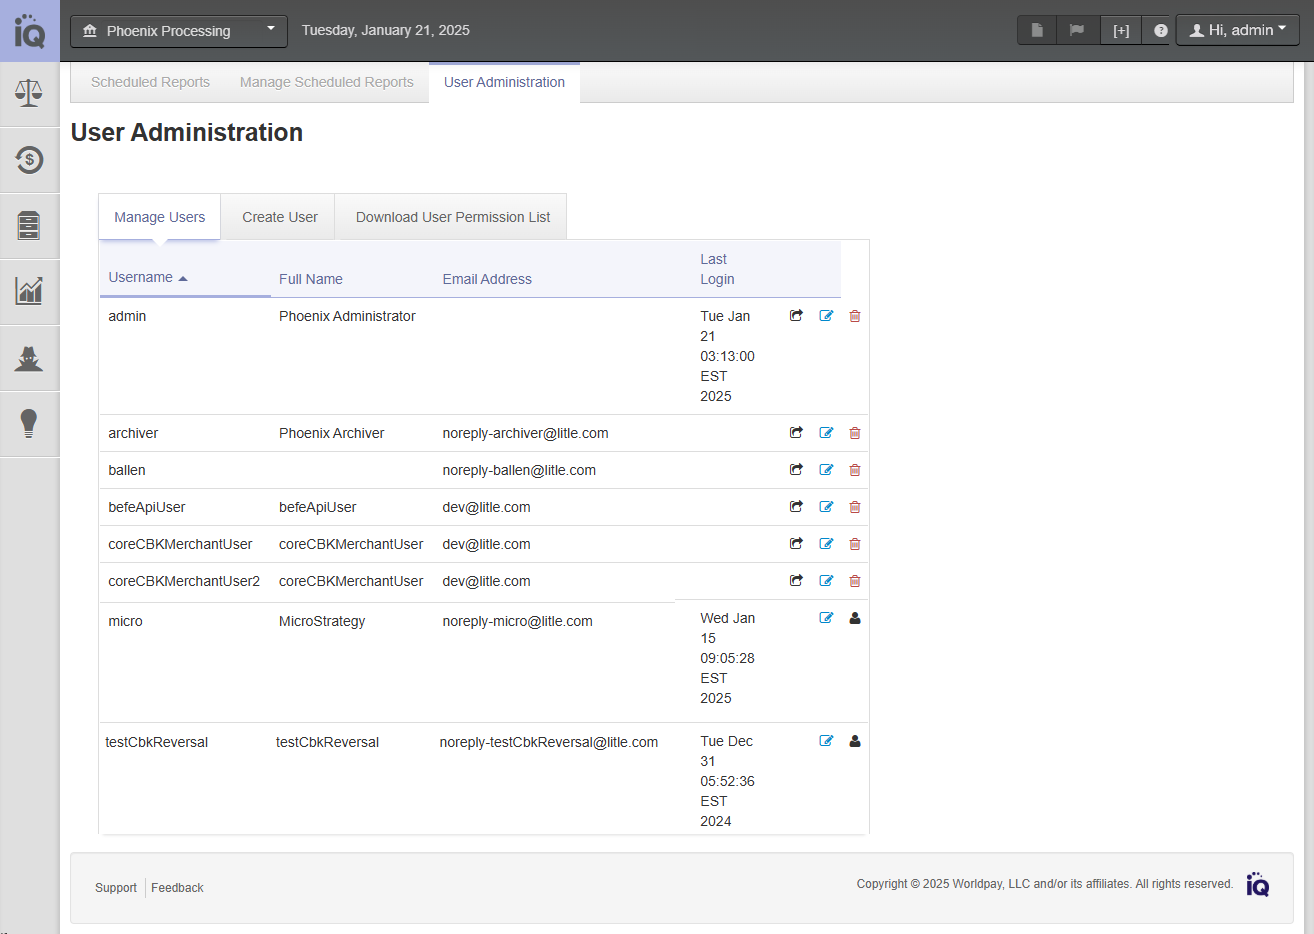
Information listed on the User Administrative screen includes all iQ users in your organization sorted by Last Login. Click any of the columns (Username, Full Name, Email, and Last Login) to re-sort the table.
The screen also includes the following action buttons for each user:
-
 - copy user name and password (to clipboard).
 -
 - edit user details
 -
 - delete iQ user.
Continue to the sections that follow for additional information on these functions.
User Administration Screen
Creating a New iQ User
To create a new user or edit an existing iQ user:
-
From the iQ Home page, click User Administration from the Home Page Navigation Bar. The User Administration page displays.
-
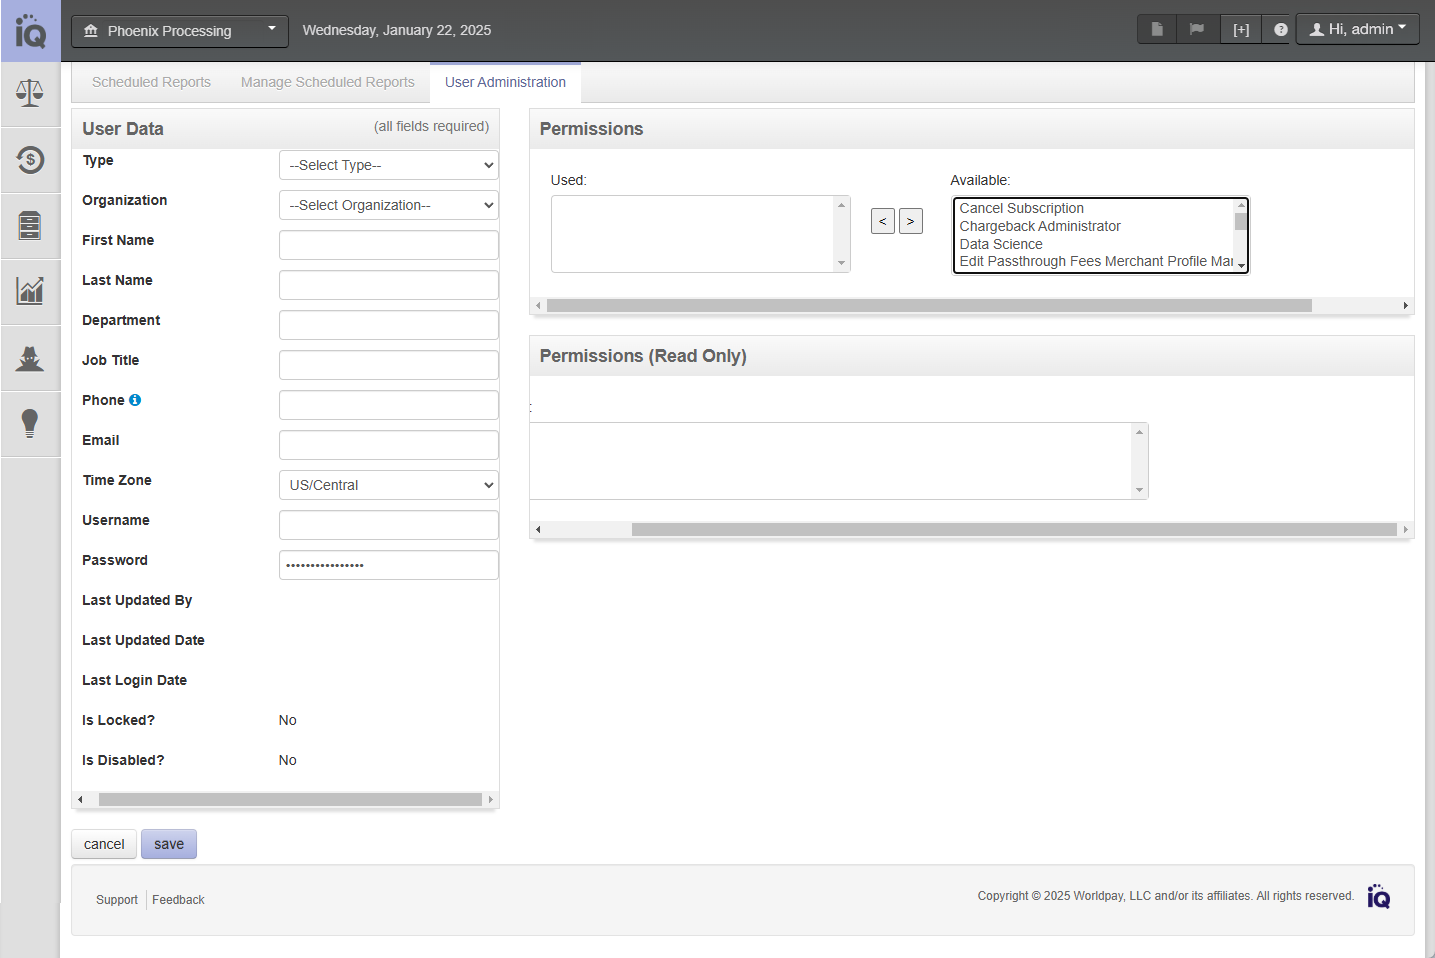
Click the Create User tab. The Create User screen appears, comprising the User Data panel, Permissions panel and Read-only Permissions panel.
-
Enter the information for the new user in the User Data panel (all fields are required). If the user already exists, the panel contains additional information on the existing user (last update, last login, etc.).
-
In the Permissions panel, scroll the Available selection box and select the desired permission(s). Click the selection arrows to move the desired permission(s) from the Available selection box to the Used box. See Managing Permissions for iQ Users for a description of each of the permissions.
-
Enter a generic password in the Password field, according to the following guidelines:
-
Must be between 12 and 24 characters in length.
-
Must have at least one upper-case letter, one lower-case letter, and one number.
-
Special characters allowed: -!@#$%^&*()_+.
-
-
Click Save. A new user is created.
Deleting an Inactive iQ User
To delete an inactive user from iQ:
-
From the iQ Home page, click User Administration from the Home Page Navigation Bar. The User Administration page displays as shown in User Administration Screen. All iQ users in your organization are listed, sorted by Last Login. Click any of the columns (Username, Full Name, Email, and Last Login) to re-sort the table.
-
Click the Delete icon (
) for the inactive user you wish to delete. A confirmation dialog box appears. -
Click Cancel or Delete User. A banner confirming the deletion of the user appears at the top of the page.
-
Repeat Step 2 and Step 3 as necessary for each applicable user account.
You cannot delete users identified as a Merchant User Admin., as denoted by the Administrator icon ( ), or users who have open chargebacks assigned to them. A warning dialog box appears when you attempt to delete users of this type.
Managing Permissions for iQ Users
Depending on your organization, the following iQ permissions are available for users in your organization:
|
Permission |
Description |
|---|---|
| AuMatchReport | Allows users to view Account Updater and Sales Recovery reports. If the merchant doesn't use these features via Worldpay, the permission is unnecessary. Make sure the View Account Updater Tab is also selected for access. |
| ChargebackAdministrator | Allows users to create, edit, enable, view, and delete custom case assignment rules, Also enables re-order rules by dragging and dropping, along with view, edit, and enable the Balanced Distribution rule. |
| ChargebackSummaryReport | Allows users to view reports on sales and chargebacks, including counts, amounts, and chargeback percentages for settled payment types. |
| CustomerInsights | Allows users to view an Insights summary. For detailed transaction information, contact your eCommerce partner or relationship manager. |
| eCheckPrenoteNOCReturn | Allows users to view the eCheck Prenote NOC Return report when using the eCheck Prenotification service |
| ExportFraudAlerts | Allows exporting of reports in CSV format with transaction-level data on Fraud-Detected Authorizations (up to seven days) and Fraud Alerts. Ensure View Fraud Dashboard permission is selected for access. |
| FinancialReports | Allows exporting of reports in CSV format with transaction-level data on Fraud-Detected Authorizations (up to seven days) and Fraud Alerts. Ensure View Fraud Dashboard permission is selected for access. |
| FraudSightDataAnalyst | Grants access to the FraudSight user interface via single sign-on from the Fraud tile on the iQ home page. A FraudSight Data Analyst can review transactions decided by FraudSight and take action on orders flagged for manual review. |
| FraudSightSupervisor | Grants access to the FraudSight user interface via single sign-on from the Fraud tile on the iQ home page. A FraudSight Supervisor has the same functionality as a FraudSight Data Analyst, plus the ability to assign manual review cases to users and add data to auto-pass and auto-fail lists |
| PayfacPortal | (PayFacs only) Allows the user to board MIDs, export mid lists, and review action items on their MIDs. |
| PayfacPortalAdmin | (PayFacs only) Allows admin access to the PayFac Portal in addition to granting new users. |
| PresenterCredentialsUpdate | Allows transact merchants to generate production credentials. |
| PresenterCredentialsView | Allows transact merchants to view production credentials. |
| RecurringReports | Allows access to Declined Plan Requests and Declined Subscription Requests reports in IQ. |
| SearchTransactions | Allows users to find any authorizations, sales, deposits, refunds and voids that were processed through Worldpay. |
| SessionReports | Allows users to view a real-time report of the data being processed by Worldpay. |
| SSR | Allows users to subscribe and manage individual Secure Scheduled Reports (SSR). |
| TransactionCapture | Allows users to deposit on authorizations with the Worldpay Payment ID. |
| TransactionRefund | Allows users to refund deposits with the Worldpay Payment ID. |
|
TransactionReversal |
Allows users to perform authorization reversals and voids with the Worldpay Payment ID. |
|
TxnSummaryReport |
Allows users to view a report of the counts and amounts for Sales and Refunds, detailed by Payment Type. Users will also have access to the Authorization Reporting. |
|
UpdateChargeback |
Allows users to work or respond to the chargeback cases and retrieval requests received by Worldpay by the card issuing banks. |
|
ViewAccountUpdaterTab |
Allows users to view Account Updater and Sales Recovery reports if required. Ensure View Au Match Report is selected for access. |
|
ViewAnalyticsTab |
Allows users to view and manipulate authorization, transaction, and sales tables or graphs on a single page. |
|
ViewApprovalsTab |
Allows users to view the AuthMax Report from the Approvals menu when AuthMax is used. |
|
ViewAuthMaxPerformance |
Displays the AuthMax lift dashboard within IQ, when AuthMax is used. |
|
ViewCardData |
Allow users access to full credit card data. Must be restricted to only individuals whose job requires such access. |
|
ViewCBNetworkTransactionData |
Allows users to view PAN data in the chargeback report. |
|
ViewChargeback |
Allows users to review the chargeback cases and retrieval requests received by Worldpay by the card issuing banks. |
|
ViewChargebackInbox |
Allows merchants to manage their chargeback cases using an Inbox structure. |
|
ViewEcheckSettlementReport |
Allows users to view a bundle of eCheck-specific reports, including Verification, Redeposit, and Returns, if eChecks are processed through Worldpay. Ensure View eCheck Tab is selected for access. |
|
ViewEcheckTab |
Allows users to view a bundle of eCheck-specific reports, including Verification, Redeposit, and Returns, if eChecks are processed through Worldpay. Ensure View eCheck Settlement Report is selected for access. |
|
ViewFraudDashboard |
Allows users to view a summary overview of pre- and post-deposit Fraud Alerts. To view transaction by transaction information, contact your RM to discuss Fraud Services. |
|
ViewPersonalData |
Allows users to view personal data such as cardholder name and billing information. Must be restricted to only individuals whose job requires such access. |
|
ViewQueryTransactions |
Allows users to access the Query Transaction Detail tab in the Batch Detail report, showing query transaction results in the specified batch (used to determine the original transaction response if not received at submission). Ensure View Session Report permission is selected for access. |
|
ViewReserveReport |
Allows users to access the Reserve Report, showing a chronological list of activities (sales, refunds, fund transfers) affecting your organization's reserve account. This report is the primary view into your escrow account. Ensure View Financial Reports permission is selected for access. |
|
ViewVaultTxnCardData |
Allows users to access to full credit card data. Must be restricted to only individuals whose job requires such access. Note: Typically paired with View Card Data, but not required if Vault is not in use by the merchant. |
|
VirtualTerminalAuth |
Allows users to submit authorizations in Virtual Terminal. |
|
VirtualTerminalAvs |
Allows users to submit a $0 Authorization to capture AVS information. |
|
VirtualTerminalCapture |
Allows users to capture deposits on external authorizations. |
|
VirtualTerminalOrphanRefund |
Allows users to submit refunds/credits to a customer's credit card. |
|
VirtualTerminalSale |
Allows users to submit sales/conditional deposits. |
Downloading a List of Permissions
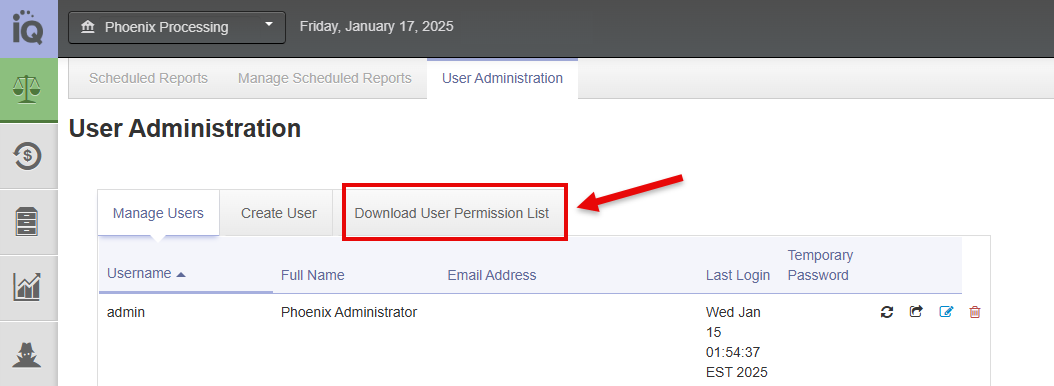
To download a Excel spreadsheet of all users and their assigned permissions, click the Download User Permission List tab.
The Permissions spreadsheet contains the following fields:
|
Field |
Description |
|---|---|
|
Accessed Organization ID |
The ID of the organization this user is allowed to access (view and manage their data). |
|
Accessed Organization Name |
The name of the organization this user is allowed to access (view and manage their data). |
|
User Name |
The user name of this user. |
|
Full Name |
The full name of this user. |
|
Deleted Date |
The date this user was deleted. |
|
Department |
The department of this user. |
|
Job Title |
The job title of this user. |
|
Phone |
The phone number of this user. |
|
|
The email of this user. |
|
Time Zone |
The time zone where this user is located. |
|
Locked? |
Indicates whether this user's account is locked (Yes or No). |
|
Reason |
Indicates the reason why this user's account is locked. |
|
Disabled? |
Indicates whether this user's account is locked (Yes or No). |
|
Reason |
Indicates the reason why this user's account is disabled. |
|
Created Date |
The creation date of this user's account. |
|
Last Login |
The date of the last login for this user. |
|
Report Group |
The reporting group in the organization to which this user reports. |
|
[Permissions (multiple)] |
Indicates the permission for this user (shown as green cells in the permission columns). See Managing Permissions for iQ Users to view the list of available permissions. |
Frequently Asked Questions
Q: Can a User Admin create another user admin?
No, User Admins cannot assign user admin permissions via self-service. To add a new user admin, create the user first and contact your client success manager (CSM) or support team to assign the appropriate permissions.
Q: Can I create multi-org users through self-service?
Multi-org users are not currently supported via self-service. Contact your CSM or support team to have multi-org users profiles created.
Q: How do I reset a password for an existing user?
To reset a user’s password, click the blue pencil icon to edit the user profile. Enter a new generic password that meets the password guidelines outlined above.
Q: What if a user is locked out or can’t log in?
You can unlock user accounts by resetting their password. Use self-service as mentioned above or the user can reset their own password using the Touble Signing In link on the login screen. If a user has not logged in after October 2024 their password must be reset manually under Edit Details. Once they are logged in they can enroll in Multi-factor Authentication (MFA) and reset their password using the Trouble Signing In link on the login screen.