Payment Flow through Smart Payment Buttons
-
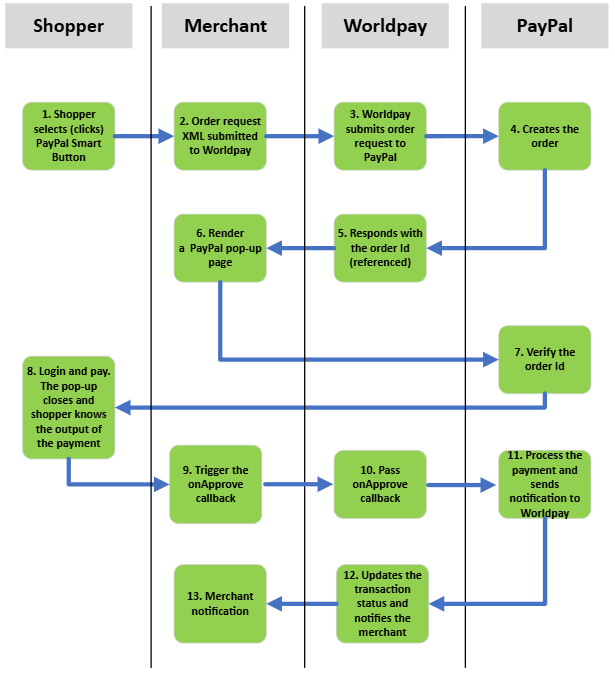
From your payment selection page, a shopper selects PayPal by clicking the Smart Payment Button.
Your system renders the PayPal Smart Payment button. This can be customized and can be done prior to this step, depending on how you define the shopper journey.
-
As soon as a payment is initiated, the
onCreateevent is called. You must then initiate an XML order request to WPG. -
Worldpay submits an order request to PayPal.
-
PayPal creates the order.
-
Worldpay responds to you with the order id (
referenceid). Include thereferenceidin theonCreatecallback response. -
PayPal verifies the order id, and if it’s correct, the PayPal login page automatically loads in-context flow (no redirection).
-
The shopper authenticates with their user name and password and completes the payment after verifying the amount, funding instrument, and shipping address (if any).
-
The PayPal window closes and triggers the
OnApprovecallback. You can show a confirmation page or directly call Worldpay to complete the payment. -
Worldpay submits a capture request to PayPal.
-
PayPal processes the payment and sends a notification to Worldpay.
-
After the payment is completed successfully, the shopper is redirected to a success notification page, which you have defined in the flow. This can be the same page.
For negative scenarios like error, cancel, etc., see the paypal.Buttons (options) section on the PayPal Developers site.
-
Worldpay updates the transaction status and sends notification.
-
Worldpay notifies you of transaction completion and latest transaction status.
To use the PayPal smart button through Worldpay, use the WPG CreateOrder call when creating an order. In the SDK’s onApprove function use the WPG order modification call with an empty approve tag (<approve/>).
For more details on PayPal's Smart Button integration, visit the Checkout section on the PayPal Developers site.