Select Open Items for Processing
This topic describes the options for selecting open AR items for processing. There are subsequent topics that detail the actual processing of the items.
Procedure
If you get an Access Denied error, contact your SAP/PCMA System Administrator as he/she controls program access.
-
Under Receivables Management menu option, go to one of the following tools:
-
Open AR - Single Customer (tcode /PMPAY/OAR).
-
Open AR - Multi Customer (tocde /PMPAY/OAR_MC)
-
-
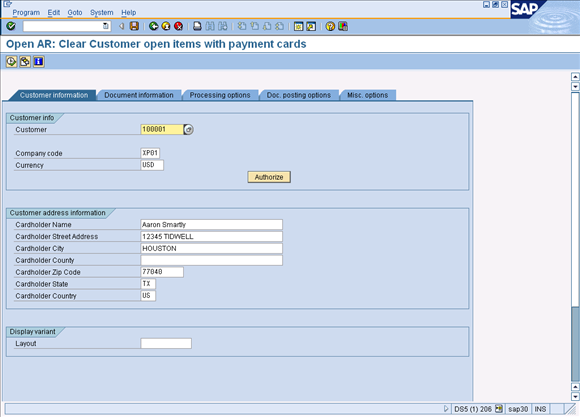
On the Customer information tab, enter the Customer number, or click in the field and choose the Customer number from the drop-down list.
-
Enter the Company Code.
-
Enter the Currency.
-
Click the check mark to populate the Customer address information. This information can be changed as needed.
Use Authorize to perform "blind" or non-accounting document related authorizations. Refer to Process Payment Card Payment via Blind Authorization for further instructions.
Blind authorization for credits is never allowed regardless of your security permissions.
-
Click the Document information tab.
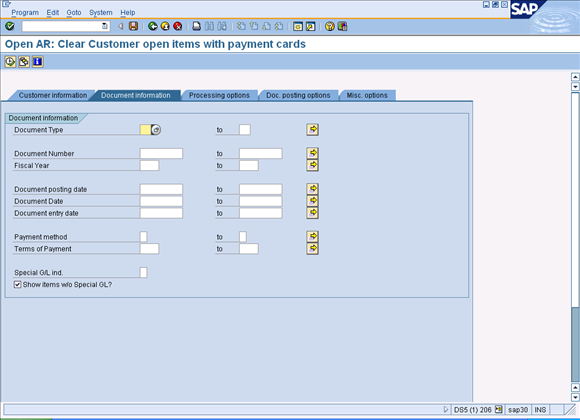
The Document information criteria section contains options to restrict the open items selected for processing based on the Accounting Document type, Document number, Fiscal year (in which the document number falls), Document posting date, Document date, Document entry date, and Payment method or Payment terms.
-
Enter restriction criteria as necessary.
-
Click the Processing options tab.
-
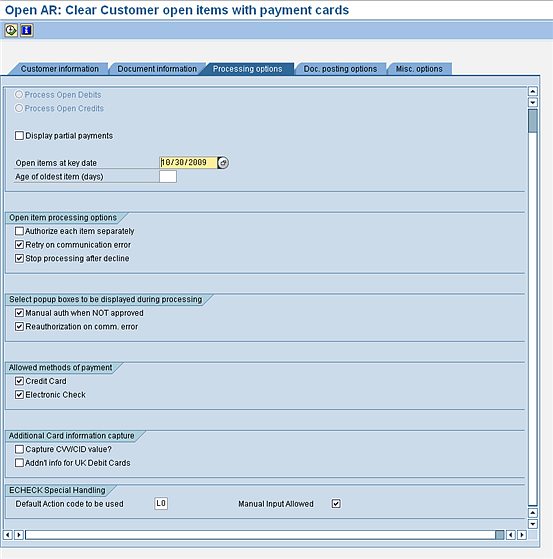
Choose the following options as necessary:
Field Value Process ALL open items
Displays both open debits and open credits. When de-selected, the Process Open Debits and Process Open Credits options are open for selection.
Process Open Debits
Displays only open debits for processing.
Process Open Credits
Displays only open credits for processing.
Display partial payments
Displays the original open items as well as any partial payments made against those open items. Open items are presented in a hierarchical view.
Open items at key date
Restricts the items displayed for processing to those items posted up to and including the specified key date. Defaults to the system date.
Age of oldest item (days)
Restricts the items displayed for processing to those that are past due by the number of days entered or are due in the future.
Authorize each item separately
Attempts a separate authorization for each open item selected.
Retry on communication error
Automatically attempts once to reauthorize a transaction if a communication error is detected during the authorization RFC call to XiPay. If subsequent communication errors are detected for the same transaction, no additional authorization will be attempted.
Stop processing after decline
Stops the program from attempting authorization (assuming multiple documents are selected for processing and the checkbox authorize each item separately is checked) for any items remaining to be processed.
Manual authorization when NOT approved
When selected, presents a popup box for entering a manual authorization after a non-approval response is received during an authorization attempt.
Reauthorization on comm. error
When selected, automatically attempts re-authorization when a communication error is detected during the authorization RFC call to XiPay.
Credit Card
Select to process credit card payments.
Electronic Check
Select to process electronic check payments.
Capture CVV/CID value?
Allows the entry of the CVV/CID security code for the card.
Additional info for UK Debit Cards
Allows the entry of a Payment Card Suffix and Valid From Date as required by some EU debit card types.
Default Action code to be used
The special handling default code which indicates whether you are processing only ECP US or ECP for US and Canada.
Manual Input Allowed
Allows you to manually enter a special handing code for ECP payments during the clearing process.
-
Click the Doc. posting options tab.
-
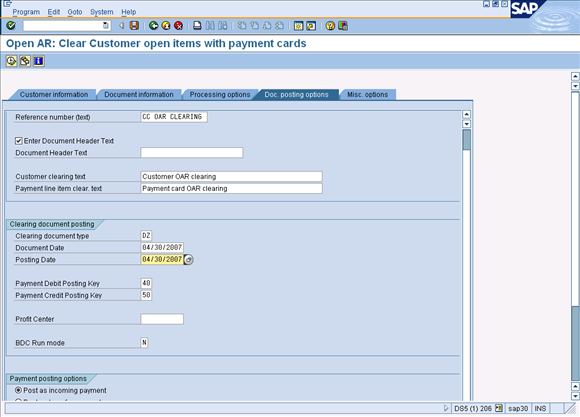
Choose the following options as necessary:
Field Value Enter reference number (text)
This value is used as the reference number text for all clearing documents which will be created and may be changed.
Enter Document Header Text
This value is used as the document header text for all clearing documents which will be created. When not checked, a popup box for entry of a Document Header Text will appear prior to each clearing document creation. This text is free form.
Customer clearing text
Text displayed on the customer line on the clearing document which will be created. This value may be changed.
Payment line item clear. text
Text displayed on the Payment Card Clearing GL account line on the clearing document which will be created. This value may be changed.
Clearing document type
Determines what document type the clearing document will be.
Document date
Defaulted to the system date and determines what the clearing document’s document date will be.
Posting date
Defaulted to the system date and determines what the clearing document’s posting date will be.
Payment Debit Posting Key
Defaulted to 40 - the posting key to be used on the clearing document when posting a DEBIT payment.
Payment Credit Posting Key
Defaulted to 50 - the posting key to be used on the clearing document when posting a CREDIT payment.
Profit Center
Complete this field to set the profit center ensuring the open AR items go to the appropriate G/L payment card clearing account.
BDC Run mode
Determines what screens to display when the clearing document is posted using standard SAP transaction FB05. By default, the field is set to N so that no screens are shown.
Note: If the value in the BDC Run Mode field is changed, the user will be shown a popup message after clicking to view the list of open items for the customer warning that results are not guaranteed and that you may proceed at your own risk.
Post as incoming payment
Dictates what type of payment will be posted on the clearing document.
Post as transfer payment
Dictates what type of payment will be posted on the clearing document.
Partial payment
Relevant only if a partial payment is made against an open item. This field causes a payment to be posted with reference to the original item.
Residual item
Relevant only if a partial payment is made against an open item. This field causes the original item to be cleared completely with the remaining open amount posted as a new open item.
Payment item reason code
Allows for a reason code to be defaulted on all open items when the open items are displayed. If a partial or residual payment is made, this reason code is used to add additional description to the payment explaining why it was not a full payment.
Ignore discounts (use gross)
When checked, all discounts associated with the Terms of Payment on the open item are disregarded and payment is made for the full open item amount.
-
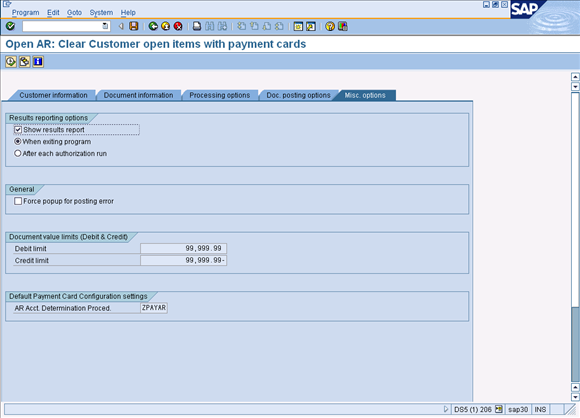
Click the Misc. Options tab.
-
Select options as necessary.
-
Debit limit – The amount actually authorized by the clearing house. It may differ from the authorization amount, as in case of partial authorization. The system uses the authorized amount to determine whether to block the sales order or delivery. Adjust as necessary.
-
Credit limit – The amount actually authorized by the clearing house. It may differ from the authorization amount, as in case of partial authorization. The system uses the authorized amount to determine whether to block the sales order or delivery. Adjust as necessary.
-
-
Choose one of the following processing options to continue:
-
View a list of open items, click Execute.
-
Clear all open items via an Online Authorization, go to the Clear All Open AR Items via an Online Authorization topic.
-
Process a manual authorization, go to the Process Payment Card Payment via Manual Authorization topic.
-
Process a blind authorization, go to the Process Payment Card Payment via Blind Authorization topic.
-